Difference between revisions of "Inkscape quick start guide"
m (→Cleaning up image: changeing numbering) |
(clearifying tutorial) |
||
| Line 2: | Line 2: | ||
| − | |||
| − | + | == inkscape screenshot overview == | |
| − | + | [[File:Inkscape_logo.png|300px|thumb|right]] | |
| + | [[File:inkscape-program-overview.jpg|600px]] | ||
| − | + | '''inkscape is open source program and free to download ː[http://www.inkscape.org http://www.inkscape.org]''' | |
| − | |||
| + | == instruction == | ||
| + | This is a short beginners tutorial to explain how to turn a image into a vector PDF, ready to vinyl or laser cutting. | ||
| − | == | + | === set document size === |
| − | + | ||
| − | + | ||
| − | + | ||
| − | + | ||
| − | + | ||
| − | + | ||
| − | + | ||
| − | + | ||
'''1.''' Go to menu > file > document properties. | '''1.''' Go to menu > file > document properties. | ||
| Line 40: | Line 33: | ||
| − | *lasercutter - [[Epilog_Mini_24]] : '''60 x 30 cm''' | + | *lasercutter - [[Epilog_Mini_24]] : '''max cutting area 60 x 30 cm''' |
| − | *vynilcutter - [[Roland_GX-24_CAMM-1]] : '''58 cm wide''' | + | *vynilcutter - [[Roland_GX-24_CAMM-1]] : '''max cutting area 58 or 48 cm wide, depending on roll size''' |
And close this window. | And close this window. | ||
| − | == | + | |
| + | |||
| + | === copy&paste image === | ||
'''3.''' Find a black&white image on google. Right click to copy the image. | '''3.''' Find a black&white image on google. Right click to copy the image. | ||
| + | |||
| + | (if your image is a PNG istead of Jpeg, then first save the file to the desktop, and in inkscape go to the menu > file > import) | ||
[[File:3_how-to-prep_inkscape_img-to-vector.jpg|300px]] | [[File:3_how-to-prep_inkscape_img-to-vector.jpg|300px]] | ||
| Line 55: | Line 52: | ||
| − | '''4.''' | + | '''4.''' Go back to inkscape, right click and to paste. |
[[File:4_how-to-prep_inkscape_img-to-vector.jpg|200px]] | [[File:4_how-to-prep_inkscape_img-to-vector.jpg|200px]] | ||
| Line 68: | Line 65: | ||
| − | + | === change image to vector === | |
| − | '''6.''' | + | '''6.''' select you image and go to the menu > path > trace bitmap |
[[File:6_how-to-prep_inkscape_img-to-vector.jpg|400px]] | [[File:6_how-to-prep_inkscape_img-to-vector.jpg|400px]] | ||
| Line 76: | Line 73: | ||
| − | '''7.''' | + | '''7.''' In this window, click on update then on ok. (it can happen that the preview will no respond after clicking on update) |
| − | + | ||
(if you want to know more about this menu ː watch [https://www.youtube.com/watch?v=i-xxhphybnE this video]) | (if you want to know more about this menu ː watch [https://www.youtube.com/watch?v=i-xxhphybnE this video]) | ||
| Line 85: | Line 81: | ||
| − | '''8.''' A | + | '''8.''' A copy should have appeared over the image. Pick it up and drag it to the side. |
| + | |||
| + | You can now delete the (original) image (select > right mouse button > delete) and keep the vector (copy). | ||
[[File:8_how-to-prep_inkscape_img-to-vector.jpg|400px]] | [[File:8_how-to-prep_inkscape_img-to-vector.jpg|400px]] | ||
| Line 91: | Line 89: | ||
| − | '''9.''' | + | === editing your design === |
| + | |||
| + | '''9. optionalː''' To make changes to the vectorː select the edit mouse from the toolbar and click on the shape. | ||
| − | The little squares that now appear (called nodes) can be | + | The little squares that now appear (called nodes) can be dragged around to where ever you like. |
[[File:10_how-to-prep_inkscape_img-to-vector.jpg|400px]] | [[File:10_how-to-prep_inkscape_img-to-vector.jpg|400px]] | ||
| − | |||
| − | |||
| − | + | === cleaning up === | |
| + | '''10. optionalː''' how to remove many details quickly, like all highlighted yellow area's of this example, . | ||
| + | Select your design, and in the menu go to path > break apart. | ||
| + | The image should break apart in a lots of little parts. Notice that the eye's turn black (this will be fixed later). | ||
| − | + | If it does not work, check if your design is not a group (menu > object > ungroup). | |
| − | + | [[File:12_how-to-prep_inkscape_img-cleanup.jpg|400px]] [[File:13_how-to-prep_inkscape_img-cleanup.jpg|400px]] | |
| − | |||
| − | |||
| − | '''12.''' | + | '''12. optionalː''' if it is hard to see what you are doing, you can temporary tun you design to lines instead of colored fills. |
Select you whole design and go to menu > object > fill&stroke. | Select you whole design and go to menu > object > fill&stroke. | ||
| Line 130: | Line 129: | ||
[[File:14_how-to-prep_inkscape_img-cleanup.jpg|400px]] | [[File:14_how-to-prep_inkscape_img-cleanup.jpg|400px]] | ||
| − | |||
| − | |||
| − | |||
| + | === set file&stroke === | ||
| + | '''14.''' before we save the file, | ||
| − | + | Select your design and go to menu > object > fill and stroke. | |
| − | and | + | |
| − | |||
| + | *'''for cutting shapes''': turn off fill, turn on stroke, set it to 255 red, and set the stroke style to 0.02 mm<br> | ||
| + | *'''For engraving''' keep the fill on and set it to black, and turn the stroke off. | ||
| + | [[File:inkscape-fill-and-stroke-menu.jpg|600px]] | ||
| − | |||
| − | |||
| + | '''15.''' if you notice that objects need to be joined, first make sure it is not a group (menu > object > ungroup) | ||
| + | [[File:inkscape-using-union.jpg|800px]] | ||
| − | |||
| + | === save file as... === | ||
| + | '''15.''' Go to the menu and choose file > save as... | ||
| − | + | Navigate to the desktop > choose either vinylcutter or lasercutter folder. | |
| − | + | ||
| − | + | ||
| − | + | ||
| − | + | ||
| − | + | ||
| − | + | ||
| − | + | ||
| − | + | ||
| − | + | ||
| − | + | ||
| − | + | ||
| − | + | ||
| − | + | ||
| − | + | ||
| − | + | ||
| − | + | ||
| − | + | ||
| − | + | ||
| − | + | ||
| − | + | ||
| − | + | ||
| − | + | ||
| − | + | ||
| − | + | ||
| − | + | ||
| − | + | ||
| − | + | ||
| − | + | ||
| − | + | ||
| − | + | ||
| − | + | ||
| − | + | ||
| − | + | ||
| − | + | ||
| − | + | ||
| − | + | ||
| − | + | ||
| − | + | ||
| − | + | ||
| − | + | ||
| − | + | ||
| − | + | ||
| − | + | ||
| − | + | ||
| − | + | ||
| − | + | ||
| − | + | ||
| − | + | ||
| − | + | ||
| − | + | ||
| − | + | ||
| − | + | ||
| − | + | ||
| − | + | ||
| − | + | ||
| − | + | ||
| − | + | ||
| − | + | ||
| − | + | ||
| − | + | ||
| − | + | ||
| − | + | ||
| − | + | ||
| − | + | ||
| − | + | ||
| − | + | ||
| − | + | ||
| − | + | ||
| − | + | ||
| − | + | ||
| − | + | ||
| − | + | ||
| − | + | ||
| − | + | ||
| − | + | ||
[[File:30_how-to-prep_inkscape_saving-as-pdf.jpg|200px]] | [[File:30_how-to-prep_inkscape_saving-as-pdf.jpg|200px]] | ||
| − | |||
| − | |||
| − | |||
Type in a descriptive file name, and select PDF as file format. Then hit the save button. | Type in a descriptive file name, and select PDF as file format. Then hit the save button. | ||
| Line 250: | Line 172: | ||
| − | '''3.''' In this | + | '''3.''' In this window the resolution to 600. And you need to choose if you want to export as drawing or as page. |
| − | |||
| − | + | '''- Exporting as drawing:''' will mean you document size will be cropped to the size of your drawing. | |
| − | + | (It will ignore your document properties setting.) | |
| − | + | ||
| − | + | ||
| − | + | ||
| − | '''- Exporting as drawing:''' will mean you document size will be | + | |
| − | + | ||
'''- Exporting as page:''' will mean it will export your document properties settings. | '''- Exporting as page:''' will mean it will export your document properties settings. | ||
| − | So you're drawing | + | So you're drawing is drawn over the edge of the page, it will get cut off. |
| Line 271: | Line 187: | ||
| + | == recommended YouTube's == | ||
| − | + | *[http://wiki.fablab.is/wiki/Inkscape recommended video's listed] | |
| − | + | *[https://sites.google.com/site/fablabiceland/home/teaching/software/inkscape icelandic video's listed] | |
| − | + | *[https://www.youtube.com/channel/UCIauCyh_UshuncR5zI7NzYg FabLab Reykjavik YouTube channel] | |
| − | + | ||
| − | + | ||
| − | + | ||
| − | + | ||
| − | * | + | |
| − | + | ||
| − | + | ||
| − | + | ||
| − | + | ||
| − | + | ||
| − | ' | + | |
| − | + | ||
| − | + | ||
| − | * | + | |
| − | + | ||
| − | + | ||
| − | + | ||
| − | + | ||
| − | + | ||
| − | + | ||
| − | + | ||
| − | + | ||
| − | + | ||
| − | + | ||
| − | + | ||
| − | + | ||
| − | + | ||
| − | + | ||
| − | + | ||
| − | + | ||
| − | + | ||
| − | + | ||
| − | + | ||
| − | + | ||
| − | + | ||
| − | + | ||
| − | * | + | |
| − | + | ||
| − | + | ||
| − | + | ||
| − | + | ||
| − | + | ||
| − | + | ||
| − | + | ||
| − | + | ||
| − | + | ||
| − | + | ||
| − | + | ||
| − | + | ||
| − | + | ||
Latest revision as of 18:58, 22 April 2016
English • Deutsch • français • español • íslenska • 日本語 • Nederlands • norsk bokmål • galego • føroyskt • Türkçe •
Contents
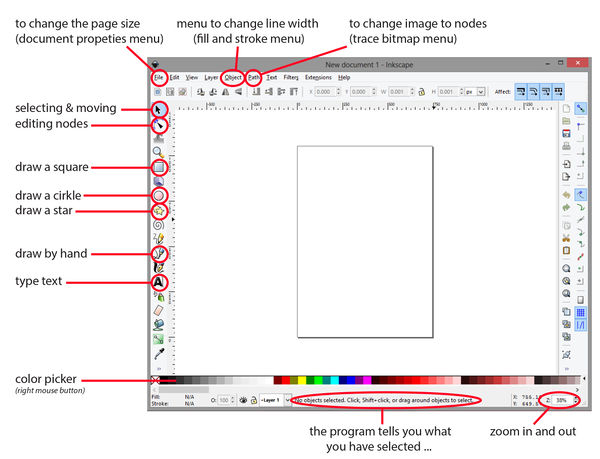
inkscape screenshot overview
inkscape is open source program and free to download ːhttp://www.inkscape.org
instruction
This is a short beginners tutorial to explain how to turn a image into a vector PDF, ready to vinyl or laser cutting.
set document size
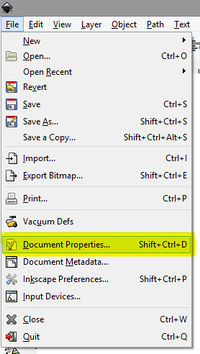
1. Go to menu > file > document properties.
2. Change the width and height to your preference.
- lasercutter - Epilog_Mini_24 : max cutting area 60 x 30 cm
- vynilcutter - Roland_GX-24_CAMM-1 : max cutting area 58 or 48 cm wide, depending on roll size
And close this window.
copy&paste image
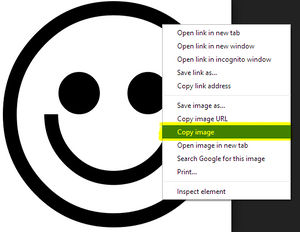
3. Find a black&white image on google. Right click to copy the image.
(if your image is a PNG istead of Jpeg, then first save the file to the desktop, and in inkscape go to the menu > file > import)
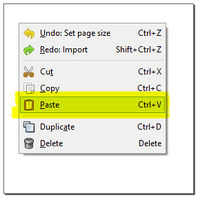
4. Go back to inkscape, right click and to paste.
5. Re-size the image to fit in the page. Hold the [CTRL] key down to keep the image in proportion.
change image to vector
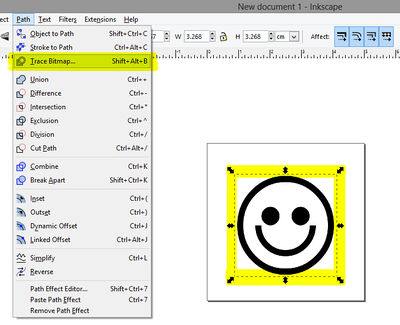
6. select you image and go to the menu > path > trace bitmap
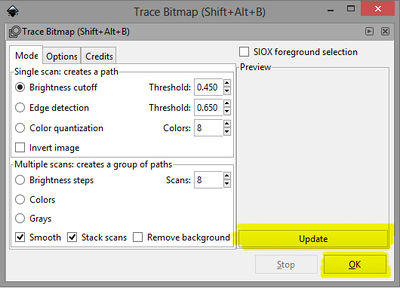
7. In this window, click on update then on ok. (it can happen that the preview will no respond after clicking on update)
(if you want to know more about this menu ː watch this video)
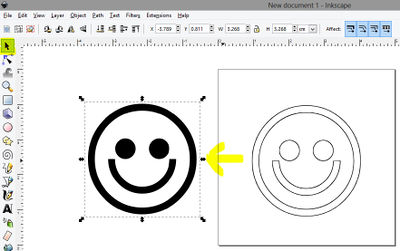
8. A copy should have appeared over the image. Pick it up and drag it to the side.
You can now delete the (original) image (select > right mouse button > delete) and keep the vector (copy).
editing your design
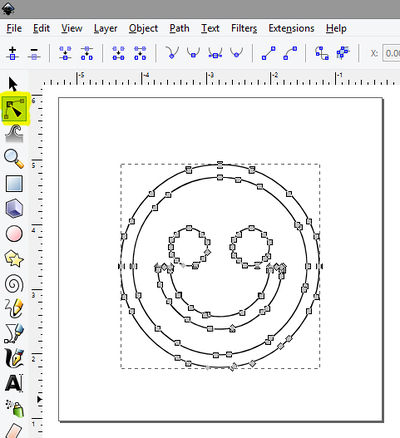
9. optionalː To make changes to the vectorː select the edit mouse from the toolbar and click on the shape.
The little squares that now appear (called nodes) can be dragged around to where ever you like.
cleaning up
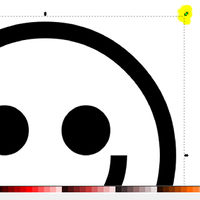
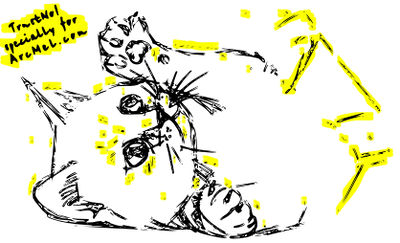
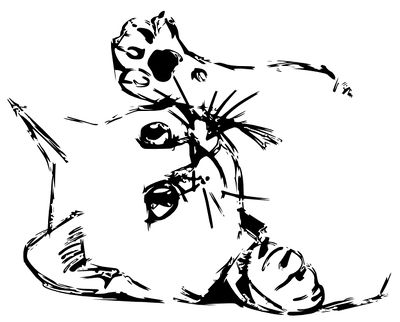
10. optionalː how to remove many details quickly, like all highlighted yellow area's of this example, .
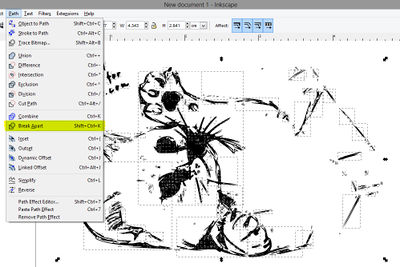
Select your design, and in the menu go to path > break apart.
The image should break apart in a lots of little parts. Notice that the eye's turn black (this will be fixed later).
If it does not work, check if your design is not a group (menu > object > ungroup).
12. optionalː if it is hard to see what you are doing, you can temporary tun you design to lines instead of colored fills.
Select you whole design and go to menu > object > fill&stroke.
13. You can now select the bits you want to delete, and clean up the design.
When done, select everything and go to menu > path > combine. That should fix the eye's again.
set file&stroke
14. before we save the file,
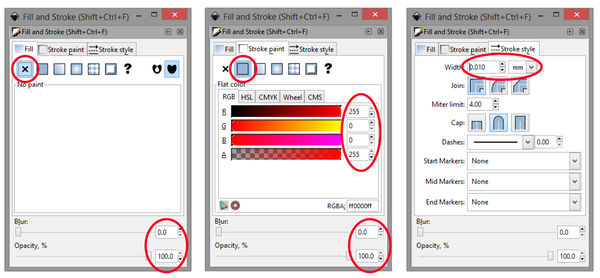
Select your design and go to menu > object > fill and stroke.
- for cutting shapes: turn off fill, turn on stroke, set it to 255 red, and set the stroke style to 0.02 mm
- For engraving keep the fill on and set it to black, and turn the stroke off.
15. if you notice that objects need to be joined, first make sure it is not a group (menu > object > ungroup)
save file as...
15. Go to the menu and choose file > save as...
Navigate to the desktop > choose either vinylcutter or lasercutter folder.
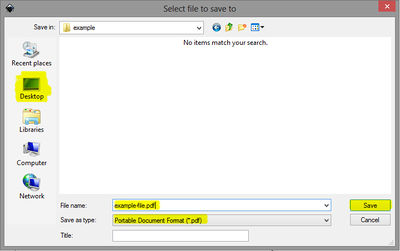
Type in a descriptive file name, and select PDF as file format. Then hit the save button.
3. In this window the resolution to 600. And you need to choose if you want to export as drawing or as page.
- Exporting as drawing: will mean you document size will be cropped to the size of your drawing.
(It will ignore your document properties setting.)
- Exporting as page: will mean it will export your document properties settings. So you're drawing is drawn over the edge of the page, it will get cut off.
recommended YouTube's
