Difference between revisions of "How to use the Roland GX-24"
m (added language bar) |
(uploading tutorial text in english - setting up machine) |
||
| Line 1: | Line 1: | ||
{{languages|How_to_use_the_Roland_GX-24}} | {{languages|How_to_use_the_Roland_GX-24}} | ||
| − | |||
| − | + | == How to set up the machine == | |
| − | + | '''1.''' Turn machine on. | |
| − | + | ||
| − | + | ||
| − | + | ||
| − | + | ||
| − | + | ||
| − | + | ||
| − | + | [[File:1_how-to-set-up-the-vinyl-cutter.jpg|400px]] | |
| − | + | ||
| − | + | ||
| − | + | ||
| − | + | ||
| − | |||
| − | |||
| − | |||
| − | |||
| − | |||
| + | '''2.''' Choose a color, place the roll on the grey tray on the backside of the machine. | ||
| − | + | [[File:0_how-to-set-up-the-vinyl-cutter.jpg|400px]] | |
| − | + | ||
| − | + | ||
| − | + | ||
| − | + | ||
| − | + | ||
| − | + | ||
| − | + | ||
| − | + | ||
| − | |||
| − | + | '''3.''' Feed the sticker trough the machine by pushing it trough the slot. Pull it trough, about as far as where the yellow warning label is on the machine. | |
| − | + | ||
| − | + | ||
| + | [[File:2_how-to-set-up-the-vinyl-cutter.jpg|400px]] | ||
| − | |||
| − | |||
| − | |||
| − | |||
| − | + | '''4.''' When feeding the material trough, make sure the lever is pushed open. | |
| − | + | ||
| + | [[File:3_how-to-set-up-the-vinyl-cutter.jpg|400px]] | ||
| − | + | '''5.''' The roll should be in the center of the machine. Place the 2 little wheels on the edge of the material. You can slide them left and right by hand. | |
| − | + | '''Important: The machine only works if the wheels are placed within the white markers.''' | |
| − | + | [[File:4_how-to-set-up-the-vinyl-cutter.jpg|400px]] | |
| − | + | ||
| − | + | ||
| − | + | ||
| − | |||
| − | |||
| − | + | '''6.''' Make sure the material is placed nice and straight. Then push the lever toward you. This will cause the little wheels to be pushed down on the sticker material. | |
| − | + | ||
| − | + | [[File:5_how-to-set-up-the-vinyl-cutter.jpg|400px]] | |
| − | + | ||
| − | * | + | |
| − | * | + | '''7.''' Now look at the menu display. Use the arrows to select 'edge'. (NOT ROLL!) |
| + | |||
| + | [[File:6_how-to-set-up-the-vinyl-cutter.jpg|400px]] | ||
| + | |||
| + | |||
| + | '''8.''' To confirm, push the [enter] button. The machine will now start moving. It will pull on the material to find the edge of the roll. | ||
| + | |||
| + | [[File:7_how-to-set-up-the-vinyl-cutter.jpg|400px]] | ||
| + | |||
| + | |||
| + | '''9.''' . Machine is now ready. | ||
| + | |||
| + | [[File:8_how-to-set-up-the-vinyl-cutter.jpg|400px]] | ||
| + | |||
| + | |||
| + | '''10.''' Open the PDF. In the menu go to file and choose print. Shortcut keys are [ctrl] + [P] | ||
| + | |||
| + | |||
| + | First you need to set the properties: so click on the properties button. | ||
| + | |||
| + | Within this window click on the 'get from machine' button. The width is now the same as the roll of material you have loaded into the machine. | ||
| + | |||
| + | '''The length you should set by hand. The standard of 1600 mm is to big!''' | ||
| + | |||
| + | [[File:10_how-to-set-up-the-vinyl-cutter.jpg|400px]] | ||
| + | |||
| + | |||
| + | '''11.''' If you don't remember what you document height was, you can check this in the main print window. | ||
| + | |||
| + | So change the length to something like 300 mm. It doesn't have to be exact, it's ok to set the length a couple of mm bigger. | ||
| + | |||
| + | [[File:9_how-to-set-up-the-vinyl-cutter.jpg|400px]] | ||
| + | |||
| + | |||
| + | Side note: If you have loaded a scrap piece of material: set machine on 'piece' in stead of edge. | ||
| + | |||
| + | In this case clicking the 'get from machine' button in the properties window is enough. | ||
| + | |||
| + | [[File:11_how-to-set-up-the-vinyl-cutter.jpg|400px]] | ||
| + | |||
| + | |||
| + | '''12.''' Now you're done with the properties window. Check in the main window that 'actual size' is selected (not fit). | ||
| + | |||
| + | You can now click on the 'print' button and the machine will start cutting. | ||
| + | |||
| + | [[File:12_how-to-set-up-the-vinyl-cutter.jpg|400px]] | ||
| + | |||
| + | |||
| + | '''13.''' When the machine stops moving around, it is done. | ||
| + | |||
| + | Use the arrows on the machine to move the sticker material toward you. With a knife to can cut off the piece you want. | ||
| + | |||
| + | Place the knife in the little slot between the light grey and the dark grey plastic of the machine, to cut nice and straight. | ||
| + | |||
| + | [[File:13_how-to-set-up-the-vinyl-cutter.jpg|400px]] | ||
| + | |||
| + | |||
| + | '''14.''' Then push the lever back to remove the roll of sticker from the machine. | ||
| + | |||
| + | [[File:14_how-to-set-up-the-vinyl-cutter.jpg|400px]] | ||
| + | |||
| + | |||
| + | |||
| + | |||
| + | |||
| + | |||
| + | '''Preparing your sticker:''' | ||
| + | |||
| + | *First peel away the background pieces of the sticker so the design looks as it did on the computer. | ||
| + | |||
| + | *Next, you place the transfer paper over your sticker and rub good. | ||
| + | |||
| + | *Then you can peel away the backing of the sticker. (The sticker design will stick to the transfer paper) | ||
| + | |||
| + | *Finally you can place the sticker on the item where you want to transfer it to. Rub one final time and gently pull away the transfer paper. DONE. | ||
| + | |||
| + | [[File:15_how-to-set-up-the-vinyl-cutter.jpg|400px]] | ||
| + | |||
| + | |||
| + | |||
| + | |||
| + | |||
| + | |||
| + | [[Category:Tutorials]] [[Category:Machine usage]] | ||
Revision as of 10:33, 14 August 2014
English • Deutsch • français • español • íslenska • 日本語 • Nederlands • norsk bokmål • galego • føroyskt • Türkçe •
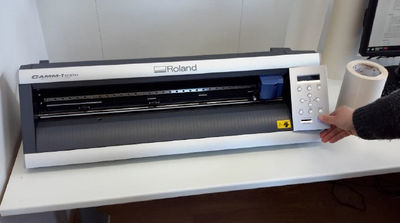
How to set up the machine
1. Turn machine on.
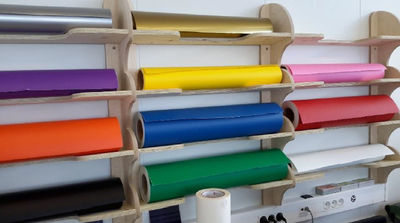
2. Choose a color, place the roll on the grey tray on the backside of the machine.
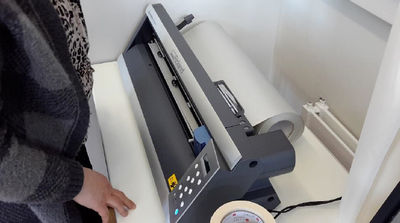
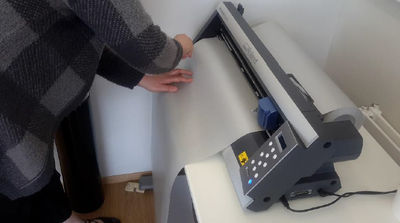
3. Feed the sticker trough the machine by pushing it trough the slot. Pull it trough, about as far as where the yellow warning label is on the machine.
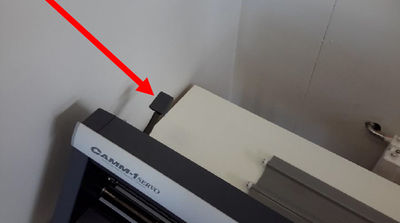
4. When feeding the material trough, make sure the lever is pushed open.
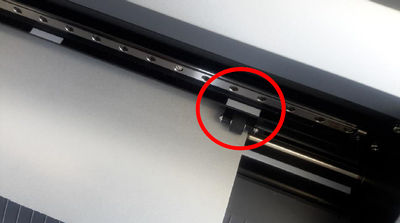
5. The roll should be in the center of the machine. Place the 2 little wheels on the edge of the material. You can slide them left and right by hand.
Important: The machine only works if the wheels are placed within the white markers.
6. Make sure the material is placed nice and straight. Then push the lever toward you. This will cause the little wheels to be pushed down on the sticker material.
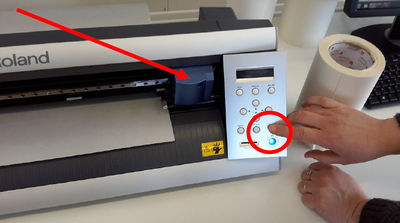
7. Now look at the menu display. Use the arrows to select 'edge'. (NOT ROLL!)
8. To confirm, push the [enter] button. The machine will now start moving. It will pull on the material to find the edge of the roll.
9. . Machine is now ready.
10. Open the PDF. In the menu go to file and choose print. Shortcut keys are [ctrl] + [P]
First you need to set the properties: so click on the properties button.
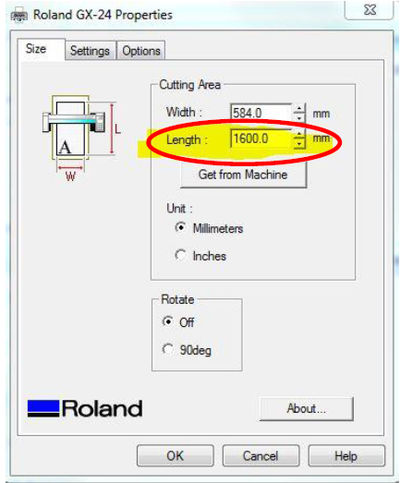
Within this window click on the 'get from machine' button. The width is now the same as the roll of material you have loaded into the machine.
The length you should set by hand. The standard of 1600 mm is to big!
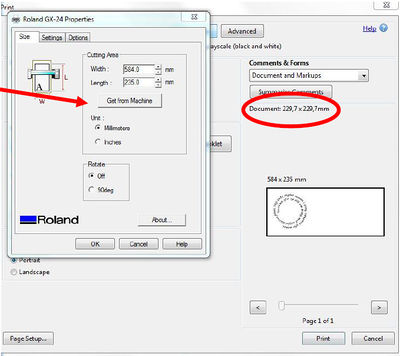
11. If you don't remember what you document height was, you can check this in the main print window.
So change the length to something like 300 mm. It doesn't have to be exact, it's ok to set the length a couple of mm bigger.
Side note: If you have loaded a scrap piece of material: set machine on 'piece' in stead of edge.
In this case clicking the 'get from machine' button in the properties window is enough.
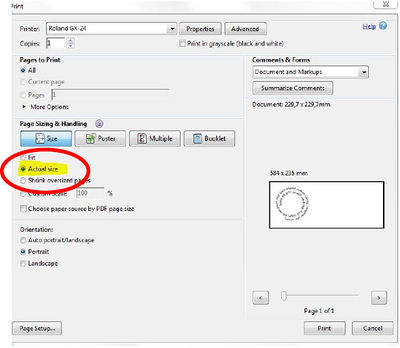
12. Now you're done with the properties window. Check in the main window that 'actual size' is selected (not fit).
You can now click on the 'print' button and the machine will start cutting.
13. When the machine stops moving around, it is done.
Use the arrows on the machine to move the sticker material toward you. With a knife to can cut off the piece you want.
Place the knife in the little slot between the light grey and the dark grey plastic of the machine, to cut nice and straight.
14. Then push the lever back to remove the roll of sticker from the machine.
Preparing your sticker:
- First peel away the background pieces of the sticker so the design looks as it did on the computer.
- Next, you place the transfer paper over your sticker and rub good.
- Then you can peel away the backing of the sticker. (The sticker design will stick to the transfer paper)
- Finally you can place the sticker on the item where you want to transfer it to. Rub one final time and gently pull away the transfer paper. DONE.
