Difference between revisions of "How to use the Shopbot"
(→Links) |
(→Links) |
||
| (23 intermediate revisions by 6 users not shown) | |||
| Line 1: | Line 1: | ||
| − | + | {{Languages|How_to_use_the_Shopbot}} | |
| + | |||
| + | |||
| + | == What is the Shopbot? == | ||
| + | |||
| + | The Shopbot is a large milling machine for cutting, phrasing and shaping wood and plastic in various 3-dimensional sizes. It can handle plates of up to 3 meters in size. The machine uses vector graphics and 3d models to get information on what to cut out. | ||
| + | |||
| + | |||
| + | == Terms == | ||
| + | |||
| + | *''VFD'' - Variable Frequency Drive; | ||
| + | *''Control computer'' - | ||
| + | *''Design computer'' - the computer you make your design | ||
| + | *''Spindel'' - f | ||
| + | *''Bit'' - | ||
| + | *''Hz'' eða ''Hertz'' - frequency; 1/s | ||
| + | *''Pedant'' -yellow pedant with ''emergency'', ''reset'' and ''start'' buttons. | ||
| − | == | + | == Images == |
| − | + | ||
| − | + | ||
| − | + | ||
| − | + | ||
| − | + | ||
| − | + | ||
| − | + | ||
| − | |||
<gallery> | <gallery> | ||
Image:Shopbot controlbox.jpg|Control computer | Image:Shopbot controlbox.jpg|Control computer | ||
| Line 20: | Line 28: | ||
Image:Shopbot vfd.jpg|VFD | Image:Shopbot vfd.jpg|VFD | ||
Image:Shopbot wrenches.jpg|Fixing wrench for shopbot tool holder | Image:Shopbot wrenches.jpg|Fixing wrench for shopbot tool holder | ||
| − | </gallery> | + | </gallery> |
| − | == Shopbot steps == | + | |
| + | |||
| + | == Shopbot steps (short version) == | ||
| + | |||
| + | #Open or Import the vector design | ||
| + | #Select the regions to VCarve or machine | ||
| + | #Specify the tool details and calculate tool paths | ||
| + | #Preview the job in any material | ||
| + | #Save the CNC code (save the tool paths) | ||
| + | |||
| + | <br> == Shopbot steps (detailed version) | ||
| + | |||
| + | |||
| + | == Prepare your design == | ||
| + | |||
| + | #Open Partworks -> Create new file -> | ||
| + | ##Define material size and units | ||
| + | #Import file to Partworks or make your design there. Partworks og Partworks 3D | ||
| − | |||
| − | |||
| − | |||
| − | |||
PartWorks can import these types of files | PartWorks can import these types of files | ||
* DXF Drawing Exchange Files for CAD systems | * DXF Drawing Exchange Files for CAD systems | ||
| Line 32: | Line 53: | ||
* AI Adobe Illustrator | * AI Adobe Illustrator | ||
* PDF Portable Document Format for industry standard print data can be done in [[Inkscape tutorial|Inkscape]] | * PDF Portable Document Format for industry standard print data can be done in [[Inkscape tutorial|Inkscape]] | ||
| − | Remember to change text to path | + | |
| − | + | Remember to change text to path File types which Partworks3D supports | |
| + | |||
* PartWorks3D can open these types of files: | * PartWorks3D can open these types of files: | ||
* V3D PartWorks3D and Vectric Cut3D files | * V3D PartWorks3D and Vectric Cut3D files | ||
| − | * STL STL Mesh files - binary & ascii | + | * STL STL Mesh files - binary & ascii |
* V3M Vector Art 3D files | * V3M Vector Art 3D files | ||
| − | * 3DS 3D Studio - binary & ascii | + | * 3DS 3D Studio - binary & ascii |
* X DirectX | * X DirectX | ||
* DXF AutoCAD 3D DXF | * DXF AutoCAD 3D DXF | ||
| Line 47: | Line 69: | ||
* OBJ Wavefront | * OBJ Wavefront | ||
| − | + | #When the design is ready you should make toolpaths for the machine. | |
| + | ##Select Tool paths. | ||
| + | ##*V-Carve: V-Carving Tool path form which is used to specify the type of carving required, tooling details, cutting parameters and name for the tool path. | ||
| + | ##*Profile: Profile Machining options provide the flexibility for cutting shapes out with optional Tabs / bridges plus an Allowance over / undercut to ensure perfect edge quality. | ||
| + | ##*Pocket: Pocket Tool path form for machining pockets. These tool paths automatically compensate for the tool geometry - diameter and angle. | ||
| + | ##*Drilling: Drilling allows the centers of selected closed vectors to be drilled to a specified depth. The Tool database includes an option to specify the Drill diameter and cutting parameters. | ||
| + | ##*Texturing: 3D Texture Machining functionality makes carving stunning sculpted surfaces very simple and perfect for making custom panels and interesting signage. Textures can be calculated inside any selected vector boundaries or if nothing is selected the complete job size. | ||
| + | ##*Clearance: The "save" height for the Z-axis. | ||
| − | + | ##Select Depth: '''Start Depth''' (D) specifies the depth at which the tool path is calculated, allowing Engraving to be machined inside a pocket region. '''Cut Depth''' (C) is the depth of the pocket or profile tool path relative to the Start Depth. | |
| − | # | + | |
| − | + | ||
| − | + | ||
| − | + | ||
| − | + | Do not cut deeper than the material thickness. | |
| − | + | ||
| − | + | ||
| − | + | ||
| − | + | ||
| − | + | ||
| − | + | ||
| − | + | ##*Select tool | |
| − | # | + | ##*Clicking the Select button opens the Tool Database from which the required Tool can be selected. |
| − | # | + | |
| − | # | + | |
| − | + | All 4 of the cutter types (V-Bit, End mill, Ball nose, Engraving) are supported and the toolpaths will automatically compensate for the geometry of the selected tool. | |
| − | + | ||
| − | + | ||
| − | + | ||
| − | + | ||
| − | + | ||
| − | + | ||
| − | + | #Save the tool paths (.shp file) | |
| − | + | #Save the project. (.crv file) | |
| − | + | ||
| − | + | ||
| − | + | <br> | |
| − | + | ||
| − | + | ||
| − | + | ||
| − | |||
| − | + | == Turning it on - checklist == | |
| + | === Starting out === | ||
| − | + | #Flip the big switch on the front (cooling fan on spindle will turn on) | |
| − | + | #Press reset button on pendant (VFD will turn on) | |
| − | + | #Set VFD to 150.0 | |
| − | + | #Turn on Shopbot 3 software | |
| − | + | ||
| − | |||
| − | |||
| − | |||
| − | |||
| − | |||
| − | + | === Warming up the spindle === | |
| + | (This doesn't need to be done if the machine has recently been used and chances are the bearings are still warm) | ||
| + | #Open yellow hand-control window | ||
| + | #Check that tool is at safe height above material | ||
| + | #Toggle output 1 | ||
| + | #Press start | ||
| + | #Slowly increase the VFD speed up to 270 | ||
| − | |||
| − | |||
| − | == | + | === Zeroing the table === |
| − | + | ||
| − | + | #Use hand control window to move bit to it's zero point | |
| + | #In the main window, select zero->zero three axis | ||
| + | #Move z axis to safe height | ||
| + | === Starting a job === | ||
| − | + | #Select File->Part file execute | |
| + | #( Check scaling, you normally want scaling to be 1 on all axis ) | ||
| + | #Click ok | ||
| + | #Press start on pendant | ||
| + | #Turn on dust sucker | ||
| + | #Click ok on screen | ||
| − | + | === Emergencies === | |
| − | + | ||
| − | + | *There are two emergency stop buttons that you can hit | |
| − | + | *You can press space on the keyboard | |
| − | + | *You can click with the mouse | |
| − | + | ||
| − | + | ||
| − | + | == Troubleshooting == | |
| − | + | ||
| − | + | *If error 91 comes up, delete c:\Program Files\Shopbot\Shopbot 3\shopbot.ini | |
| − | + | **then, when you turn it on, select settings for PRS Alpha 120x60 | |
| − | + | **Set software to mm in the "other settings" tab. | |
| − | + | ||
| − | + | ||
| − | + | == Settings == | |
| − | + | ||
| − | + | Depending on type of bits and materials, | |
| − | + | ||
| + | <br> | ||
| + | |||
| + | {| border="1" | ||
| + | |- | ||
| + | | Frequency on VFD | ||
| + | | Rounds per minute | ||
| + | | Material | ||
| + | |- | ||
| + | | x | ||
| + | | 3000 | ||
| + | | Aluminium | ||
| + | |- | ||
| + | | 150 | ||
| + | | x | ||
| + | | Model Wax | ||
| + | |- | ||
| + | | 200 | ||
| + | | 10000 | ||
| + | | Plastics | ||
| + | |- | ||
| + | | 270 | ||
| + | | 13500 | ||
| + | | Most plywood, MDF, and so on. | ||
| + | |- | ||
| + | | 300 | ||
| + | | 15000 | ||
| + | | Hardwood | ||
| + | |} | ||
| + | |||
| + | |||
| + | == Assembly == | ||
| + | |||
| + | Assembly of the Shopbot can diverge significantly from the instructions in the enclosed instructions manual, mostly due to it being written in a "one size fits all" manner that doesn't really fit in with the different versions of the Shopbot. | ||
| + | |||
| + | |||
| + | == Proprietary protocol == | ||
| + | |||
| + | The Shopbot is connected to a computer over USB (or serial link on older models). A proprietary program written in Visual Basic is used to communicate the Shopbot Parts Files to the machine. These files are written in Gerber language. | ||
| + | |||
| + | It is as of yet unclear whether the machine's control box itself interprets these Gerber files or whether the control is in the hands of the control software. Neither would be particularly surprising, but if the control box interprets the Gerber commands then it is far easier to hack the protocol and create a free interface to the Shopbot. | ||
| + | |||
| + | |||
| + | == Power requirements == | ||
| + | |||
| + | "The DC power supply in the Standard boxes is rated at 500VA. In the US on 110V power the current requirement is 4.5A. In the rest of the world running on 220V single phase the current requirement is 2.17A. | ||
| + | |||
| + | <br> The rest of the power consumption for Routers and Spindles: | ||
| + | |||
| + | 110V Router 15A | ||
| + | 220V Router 11A | ||
| + | 2.2 HP Spindle 24A 1ø 230V 15A 3ø 230V 8A 3ø 380/460V | ||
| + | 3 HP Spindle 24A 1ø 230V 15A 3ø 230V 8A 3ø 380/460V | ||
| + | 4 HP Spindle 33A 1ø 230V 24A 3ø 230V 20A 3ø 380/460V | ||
| + | 5 HP Spindle 33A 1ø 230V 24A 3ø 230V 20A 3ø 380/460V " | ||
| + | |||
| + | |||
| + | == Links == | ||
| + | *[http://www.shopbottools.com/ShopBotDocs/maintenance.htm Shopbot Maintenance Documents] | ||
| + | *[C:/Program Files/ShopBot/PartWorks/Help/index.htm Help manual on your computer] | ||
| + | *[http://shopbotwiki.com/index.php?title=Main_Page Shopbot wiki] | ||
| + | *[http://www.shopbottools.com/documentation.htm Shopbot tutorial] | ||
| + | *[http://www.shopbottools.com/files/docs/SBG00143060802Safety.pdf Shopbot Safety Reminders] | ||
| + | *[http://blogs.fabfolk.com/aysheshim/?p=86] | ||
| + | *[http://www.onsrud.com/files/pdf/OC-09CatalogR.pdf Onsrud.com catalog (.pdf)] | ||
| + | *[http://www.sgstool.com/catalogs/PDFs/SGSMegaCatalog.pdf SG tools catalog (.pdf)] | ||
| + | *[http://fab.cba.mit.edu/content/tools/shopbot/index.html How to use the shopbot: step by step] | ||
| + | |||
| + | How to use and maintain: | ||
| + | *http://wiki.fablab.is/wiki/How_to_use_the_Shopbot | ||
| + | http://www.shopbottools.com/mSupport/tutorials.htm | ||
| + | |||
| + | Prices: | ||
| + | *http://www.shopbottools.com/PriceList.pdf | ||
| + | |||
| + | How using the ShopBot is taught at Fab Academy: | ||
| + | *http://academy.kaziunas.com/tutorials/make_something_big_overview.php | ||
| − | === | + | == Videos == |
| − | + | ||
| − | + | === Shopbot Partworks Quickstart === | |
| − | + | <br> | |
| − | + | {{#ev:youtube|wSHQsthRajg}} | |
| − | |||
| − | + | === Spindle Collet Assembly === | |
| − | + | {{#ev:youtube|D2-wL8jAxVI}} | |
| − | # | + | |
| − | + | ||
| − | + | ||
| − | + | ||
| − | + | ||
| − | + | ||
| − | + | ||
| − | |||
| − | |||
| − | + | === Using Z zero plate === | |
| − | + | ||
| − | {| | + | {{#ev:youtube|IaUTzTVBFzs}} |
| − | + | ||
| − | + | ||
| − | + | ||
| − | + | ||
| − | + | ||
| − | + | ||
| − | + | ||
| − | + | ||
| − | + | ||
| − | |||
| − | |||
| − | |||
| − | |||
| − | |||
| − | |||
| − | |||
| − | |||
| − | |||
| − | |||
| − | |||
| − | |||
| − | |||
| − | |||
| − | |||
| − | |||
| − | |||
| − | |||
| − | |||
| − | |||
| − | |||
| − | |||
| − | |||
| − | |||
| − | |||
| − | |||
| − | |||
| − | |||
| − | + | [[Category:Tutorials]] [[Category:Machine_Tutorials]] | |
| − | + | ||
| − | + | ||
| − | + | ||
| − | + | ||
Latest revision as of 12:08, 11 September 2017
English • Deutsch • français • español • íslenska • 日本語 • Nederlands • norsk bokmål • galego • føroyskt • Türkçe •
Contents
What is the Shopbot?
The Shopbot is a large milling machine for cutting, phrasing and shaping wood and plastic in various 3-dimensional sizes. It can handle plates of up to 3 meters in size. The machine uses vector graphics and 3d models to get information on what to cut out.
Terms
- VFD - Variable Frequency Drive;
- Control computer -
- Design computer - the computer you make your design
- Spindel - f
- Bit -
- Hz eða Hertz - frequency; 1/s
- Pedant -yellow pedant with emergency, reset and start buttons.
Images

Control computer

Pedant with emergency, reset and start buttons
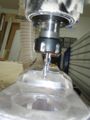
Spindle

Spindle

Bits

VFD
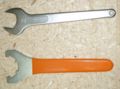
Fixing wrench for shopbot tool holder


Shopbot steps (short version)
- Open or Import the vector design
- Select the regions to VCarve or machine
- Specify the tool details and calculate tool paths
- Preview the job in any material
- Save the CNC code (save the tool paths)
== Shopbot steps (detailed version)
Prepare your design
- Open Partworks -> Create new file ->
- Define material size and units
- Import file to Partworks or make your design there. Partworks og Partworks 3D
PartWorks can import these types of files
* DXF Drawing Exchange Files for CAD systems
* EPS Encapsulated Postscript for example. Adobe Illustrator and Corel Draw.
* AI Adobe Illustrator
* PDF Portable Document Format for industry standard print data can be done in Inkscape
Remember to change text to path File types which Partworks3D supports
* PartWorks3D can open these types of files:
* V3D PartWorks3D and Vectric Cut3D files
* STL STL Mesh files - binary & ascii
* V3M Vector Art 3D files
* 3DS 3D Studio - binary & ascii
* X DirectX
* DXF AutoCAD 3D DXF
* LWO LightWave
* TXT MaxNC Digital Probe
* SBP ShopBot Digital Probe files
* WRL VRML
* OBJ Wavefront
- When the design is ready you should make toolpaths for the machine.
- Select Tool paths.
- V-Carve: V-Carving Tool path form which is used to specify the type of carving required, tooling details, cutting parameters and name for the tool path.
- Profile: Profile Machining options provide the flexibility for cutting shapes out with optional Tabs / bridges plus an Allowance over / undercut to ensure perfect edge quality.
- Pocket: Pocket Tool path form for machining pockets. These tool paths automatically compensate for the tool geometry - diameter and angle.
- Drilling: Drilling allows the centers of selected closed vectors to be drilled to a specified depth. The Tool database includes an option to specify the Drill diameter and cutting parameters.
- Texturing: 3D Texture Machining functionality makes carving stunning sculpted surfaces very simple and perfect for making custom panels and interesting signage. Textures can be calculated inside any selected vector boundaries or if nothing is selected the complete job size.
- Clearance: The "save" height for the Z-axis.
- Select Tool paths.
- Select Depth: Start Depth (D) specifies the depth at which the tool path is calculated, allowing Engraving to be machined inside a pocket region. Cut Depth (C) is the depth of the pocket or profile tool path relative to the Start Depth.
Do not cut deeper than the material thickness.
- Select tool
- Clicking the Select button opens the Tool Database from which the required Tool can be selected.
All 4 of the cutter types (V-Bit, End mill, Ball nose, Engraving) are supported and the toolpaths will automatically compensate for the geometry of the selected tool.
- Save the tool paths (.shp file)
- Save the project. (.crv file)
Turning it on - checklist
Starting out
- Flip the big switch on the front (cooling fan on spindle will turn on)
- Press reset button on pendant (VFD will turn on)
- Set VFD to 150.0
- Turn on Shopbot 3 software
Warming up the spindle
(This doesn't need to be done if the machine has recently been used and chances are the bearings are still warm)
- Open yellow hand-control window
- Check that tool is at safe height above material
- Toggle output 1
- Press start
- Slowly increase the VFD speed up to 270
Zeroing the table
- Use hand control window to move bit to it's zero point
- In the main window, select zero->zero three axis
- Move z axis to safe height
Starting a job
- Select File->Part file execute
- ( Check scaling, you normally want scaling to be 1 on all axis )
- Click ok
- Press start on pendant
- Turn on dust sucker
- Click ok on screen
Emergencies
- There are two emergency stop buttons that you can hit
- You can press space on the keyboard
- You can click with the mouse
Troubleshooting
- If error 91 comes up, delete c:\Program Files\Shopbot\Shopbot 3\shopbot.ini
- then, when you turn it on, select settings for PRS Alpha 120x60
- Set software to mm in the "other settings" tab.
Settings
Depending on type of bits and materials,
| Frequency on VFD | Rounds per minute | Material |
| x | 3000 | Aluminium |
| 150 | x | Model Wax |
| 200 | 10000 | Plastics |
| 270 | 13500 | Most plywood, MDF, and so on. |
| 300 | 15000 | Hardwood |
Assembly
Assembly of the Shopbot can diverge significantly from the instructions in the enclosed instructions manual, mostly due to it being written in a "one size fits all" manner that doesn't really fit in with the different versions of the Shopbot.
Proprietary protocol
The Shopbot is connected to a computer over USB (or serial link on older models). A proprietary program written in Visual Basic is used to communicate the Shopbot Parts Files to the machine. These files are written in Gerber language.
It is as of yet unclear whether the machine's control box itself interprets these Gerber files or whether the control is in the hands of the control software. Neither would be particularly surprising, but if the control box interprets the Gerber commands then it is far easier to hack the protocol and create a free interface to the Shopbot.
Power requirements
"The DC power supply in the Standard boxes is rated at 500VA. In the US on 110V power the current requirement is 4.5A. In the rest of the world running on 220V single phase the current requirement is 2.17A.
The rest of the power consumption for Routers and Spindles:
   110V Router         15A
 220V Router         11A
 2.2 HP Spindle     24A 1ø 230V     15A  3ø 230V    8A 3ø 380/460V
 3 HP Spindle        24A 1ø 230V     15A  3ø 230V    8A 3ø 380/460V
 4 HP Spindle        33A 1ø 230V     24A  3ø 230V    20A 3ø 380/460V
 5 HP Spindle        33A 1ø 230V     24A  3ø 230V    20A 3ø 380/460V "
Links
- Shopbot Maintenance Documents
- [C:/Program Files/ShopBot/PartWorks/Help/index.htm Help manual on your computer]
- Shopbot wiki
- Shopbot tutorial
- Shopbot Safety Reminders
- [1]
- Onsrud.com catalog (.pdf)
- SG tools catalog (.pdf)
- How to use the shopbot: step by step
How to use and maintain:
http://www.shopbottools.com/mSupport/tutorials.htm
Prices:
How using the ShopBot is taught at Fab Academy:
Videos
Shopbot Partworks Quickstart
Spindle Collet Assembly