Difference between revisions of "Inkscape how to make a pressfit design"
Markohietala (Talk | contribs) m (→Stoke vs. Fill) |
(→inkscape ː how to offset trick: improving text) |
||
| (3 intermediate revisions by the same user not shown) | |||
| Line 7: | Line 7: | ||
== Understanding the laser cutter == | == Understanding the laser cutter == | ||
| − | The | + | The lasercutter cuts by burning away a little bit of the material. The laser follows the center of your vector line (drawing) and will burn away 0.1 mm of material on each side of the vector. Beware! Different materials and different heat settings can influence how much material exactly is lost. It is recommended to first test joinery designs before cutting the whole sheet. |
| − | + | ||
| − | Beware! Different materials and different settings | + | |
[[File:laser-cutting-example.jpg|400px]] | [[File:laser-cutting-example.jpg|400px]] | ||
| Line 15: | Line 13: | ||
'''The burning away 0.2 mm of material is a guideline, not a golden rule.''' | '''The burning away 0.2 mm of material is a guideline, not a golden rule.''' | ||
| − | |||
| − | |||
| − | |||
| − | |||
| Line 34: | Line 28: | ||
=== Stroke vs. Fill === | === Stroke vs. Fill === | ||
| + | Open up the menu by going to object > fill and stroke. | ||
| − | + | In this menu you can change the fill (color) and the line thickness of your object. If you want to design something where scale matters (like with press fit) it is recommended to draw with a "fill" only. Because the line thickness is added to the size of your object. | |
| − | |||
=== Example stroke vs. fill === | === Example stroke vs. fill === | ||
| + | Draw a box of 50 by 50 mm, but also set a line width to 2 mm. (object > fill and stroke) | ||
| − | + | Now if you look at the object with the box tool, it still seems to look ok, because that tool measures from vector to vector. | |
| − | + | ||
| − | Now if you look at the object with the box tool, | + | |
[[File:laser-cutting-example_3.jpg|400px]] | [[File:laser-cutting-example_3.jpg|400px]] | ||
| Line 49: | Line 42: | ||
| − | But if you use the black mouse tool to select your object, you can see that the line width is actually included in the size. Hence | + | But if you use the black mouse tool to select your object, you can see that the line width is actually gets included in the size of your box. The line width of 2 mm get's added from the center of your vector. Hence actual size of you box is 52 x 52 mm. |
[[File:laser-cutting-example_4.jpg|400px]] | [[File:laser-cutting-example_4.jpg|400px]] | ||
| − | |||
| − | Let's say we want to make something like in this image | + | |
| + | |||
| + | |||
| + | == inkscape ː how to make a test shape for lasercut pressfit == | ||
| + | |||
| + | Let's say we want to make something like in this image, having 2 pieces with a slot, that (press) fit together. | ||
[[File:Cardbord-pressfit-test.jpg|400px]] | [[File:Cardbord-pressfit-test.jpg|400px]] | ||
| Line 70: | Line 67: | ||
The MDF you see in the photo is a standard plate of 4 mm thick, but if you measure it you can see that it's actually 4,13 mm. | The MDF you see in the photo is a standard plate of 4 mm thick, but if you measure it you can see that it's actually 4,13 mm. | ||
| − | |||
| − | |||
| Line 79: | Line 74: | ||
| − | '''4.''' If the smaller box is behind the bigger box you can let them | + | '''4.''' If the smaller box is behind the bigger box you can let them switch places by selecting the shape you want to move to the front, and go to Object > Raise to Top |
[[File:2_inkscape-how-to-make-press-fit.jpg|400px]] | [[File:2_inkscape-how-to-make-press-fit.jpg|400px]] | ||
| Line 86: | Line 81: | ||
'''5.''' To get the smaller box nicely centered. Go to Object > Align and Distribute. | '''5.''' To get the smaller box nicely centered. Go to Object > Align and Distribute. | ||
| − | + | Select both shapes, then choose in the Align and Distribute menu 'biggest object' and click on 'center on vertical axis' button. | |
[[File:3_inkscape-how-to-make-press-fit.jpg|400px]] | [[File:3_inkscape-how-to-make-press-fit.jpg|400px]] | ||
| − | '''6.''' | + | '''6.''' To subtract the blue box from the red one, select both shapes. Go to Path > Difference. |
| − | + | ||
[[File:4_inkscape-how-to-make-press-fit.jpg|400px]] | [[File:4_inkscape-how-to-make-press-fit.jpg|400px]] | ||
| Line 101: | Line 95: | ||
| − | == | + | == inkscape ː how to offset trick == |
| − | '''7.''' Select your design | + | '''7.''' Select your design and go to menu > Object > Fill and Stroke. |
[[File:5_inkscape-how-to-make-press-fit.jpg|400px]] | [[File:5_inkscape-how-to-make-press-fit.jpg|400px]] | ||
| − | '''8.''' Go | + | '''8.''' Go to the stroke style tab and change the line width to 0.2 mm. |
| − | + | ||
| − | + | ||
| − | + | ||
[[File:6_inkscape-how-to-make-press-fit.jpg|400px]] | [[File:6_inkscape-how-to-make-press-fit.jpg|400px]] | ||
| − | ''' | + | '''9.''' (While your object is still selected) in the menu choose Path > Stroke to path. |
| − | ''' | + | '''10.''' (While your object is still selected) next in the menu select Path > break apart. |
| − | Your object should now have adopted the color from your | + | Your object should now have adopted the color from your stroke (in my case blue). |
[[File:7_inkscape-how-to-make-press-fit.jpg|400px]] | [[File:7_inkscape-how-to-make-press-fit.jpg|400px]] | ||
| − | ''' | + | '''11.''' (While your object is still selected) In the Fill and Stroke menu, turn off the fill by clicking on the X in the Fill tab. |
| − | + | ||
[[File:8_inkscape-how-to-make-press-fit.jpg|400px]] | [[File:8_inkscape-how-to-make-press-fit.jpg|400px]] | ||
| − | ''' | + | '''12.''' (While your object is still selected) Then back to the stroke style tab and set the line width to the normal 0.02 mm |
| − | + | ||
| − | + | ||
| − | + | ||
[[File:9_inkscape-how-to-make-press-fit.jpg|400px]] | [[File:9_inkscape-how-to-make-press-fit.jpg|400px]] | ||
| − | ''' | + | '''13.''' Deselect everything by clicking outside your shape (no more dotted lines) |
| − | + | ||
| − | + | ||
| − | + | ||
| − | ''' | + | '''14.''' Now select the innermost line of you object and delete that line (right mouse button > delete). |
[[File:10_inkscape-how-to-make-press-fit.jpg|400px]] | [[File:10_inkscape-how-to-make-press-fit.jpg|400px]] | ||
| − | ''Beware. If you design has a hole in it, then you | + | ''Beware. If you design has a hole in it, then you delete the outside line then instead.'' |
| − | ''' | + | '''15.''' All done, now save file as PDF, and you are ready for laser cutting. |
== Example of press fit project == | == Example of press fit project == | ||
Latest revision as of 16:40, 13 June 2016
English • Deutsch • français • español • íslenska • 日本語 • Nederlands • norsk bokmål • galego • føroyskt • Türkçe •

Contents
Understanding the laser cutter
The lasercutter cuts by burning away a little bit of the material. The laser follows the center of your vector line (drawing) and will burn away 0.1 mm of material on each side of the vector. Beware! Different materials and different heat settings can influence how much material exactly is lost. It is recommended to first test joinery designs before cutting the whole sheet.
The burning away 0.2 mm of material is a guideline, not a golden rule.
Inkscape example: sizes
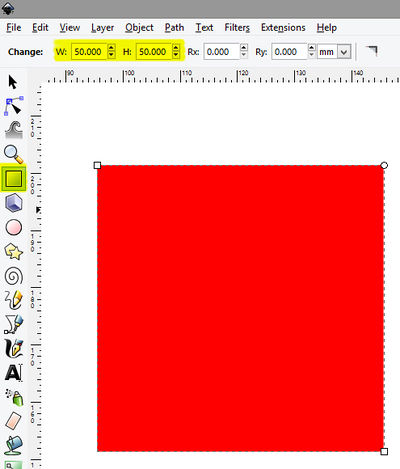
Here you see a box drawn with the size of 50 mm by 50 mm.
But after cutting out this cube with the laser cutter, the actual size would be 49.8 mm by 49.8 mm as the laser will remove 0.1 mm from all sides.
Stroke vs. Fill
Open up the menu by going to object > fill and stroke.
In this menu you can change the fill (color) and the line thickness of your object. If you want to design something where scale matters (like with press fit) it is recommended to draw with a "fill" only. Because the line thickness is added to the size of your object.
Example stroke vs. fill
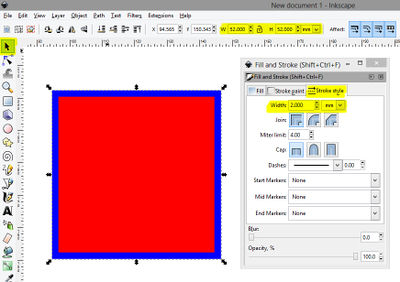
Draw a box of 50 by 50 mm, but also set a line width to 2 mm. (object > fill and stroke)
Now if you look at the object with the box tool, it still seems to look ok, because that tool measures from vector to vector.
But if you use the black mouse tool to select your object, you can see that the line width is actually gets included in the size of your box. The line width of 2 mm get's added from the center of your vector. Hence actual size of you box is 52 x 52 mm.
inkscape ː how to make a test shape for lasercut pressfit
Let's say we want to make something like in this image, having 2 pieces with a slot, that (press) fit together.
1. Create a large box (50 x 50 mm)
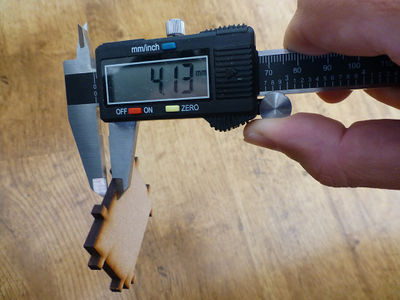
2. Measure you plate of material.
The MDF you see in the photo is a standard plate of 4 mm thick, but if you measure it you can see that it's actually 4,13 mm.
3. Create a smaller box that overlaps the first, and give it a width of your measured plate.
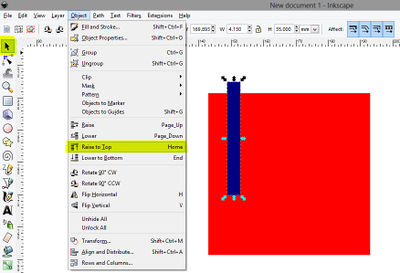
4. If the smaller box is behind the bigger box you can let them switch places by selecting the shape you want to move to the front, and go to Object > Raise to Top
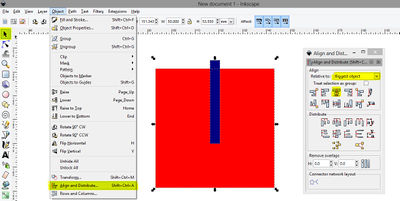
5. To get the smaller box nicely centered. Go to Object > Align and Distribute.
Select both shapes, then choose in the Align and Distribute menu 'biggest object' and click on 'center on vertical axis' button.
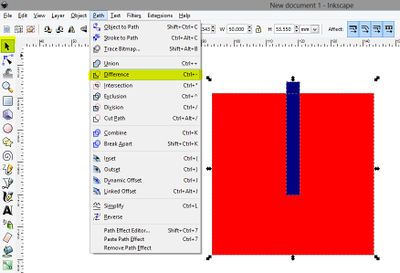
6. To subtract the blue box from the red one, select both shapes. Go to Path > Difference.
Now you design is ready, final step is to prepare it for the laser cutter.
inkscape ː how to offset trick
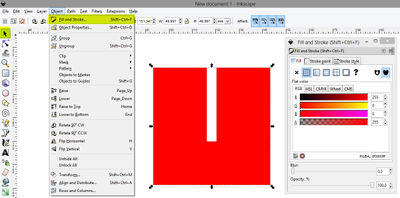
7. Select your design and go to menu > Object > Fill and Stroke.
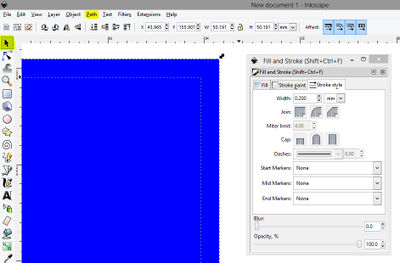
8. Go to the stroke style tab and change the line width to 0.2 mm.
9. (While your object is still selected) in the menu choose Path > Stroke to path.
10. (While your object is still selected) next in the menu select Path > break apart.
Your object should now have adopted the color from your stroke (in my case blue).
11. (While your object is still selected) In the Fill and Stroke menu, turn off the fill by clicking on the X in the Fill tab.
12. (While your object is still selected) Then back to the stroke style tab and set the line width to the normal 0.02 mm
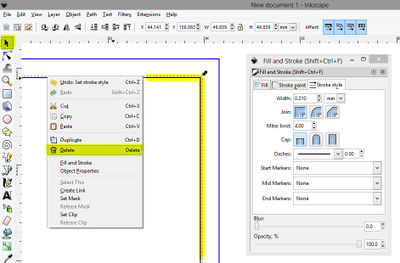
13. Deselect everything by clicking outside your shape (no more dotted lines)
14. Now select the innermost line of you object and delete that line (right mouse button > delete).
Beware. If you design has a hole in it, then you delete the outside line then instead.
15. All done, now save file as PDF, and you are ready for laser cutting.

