Difference between revisions of "Makerbot Replicator 2"
From Fab Lab Wiki - by NMÍ Kvikan
m (→Examples: adding link) |
m (→Usage machine: updating) |
||
| Line 45: | Line 45: | ||
*Export your design as .STL or as .OBJ | *Export your design as .STL or as .OBJ | ||
| − | * | + | *Inport your file to [http://www.makerbot.com/makerware Makerware] program. ''( View: [https://www.youtube.com/watch?v=0Gi0cjtgO1o How to use Makerware] )'' |
| − | * | + | *Set up your settings, then check printing time estimation. |
| + | *Export file as X3G format and copy that to SDcard of 3Dprinter to start printing. | ||
| + | ==== Settings Makerware ==== | ||
| + | *Devices > Select type of device > Replicator 2 | ||
| + | *Settings button > Set up the 'Quick tab' | ||
| + | *Print quality > LOW ( [https://www.flickr.com/photos/fablab-reykjavik/16253672323/in/album-72157643999814175/ result example print] )̈ | ||
| + | *Raftː turn on if needed (extra platform beneath your design)̈ | ||
| + | *Supportː turn on if needed (print creates support columns beneath overhangs in your design)̈̈ | ||
| + | *Layer height/infill/number of shells can stay on default settings | ||
| − | ==== | + | |
| + | ==== Tutorial ==== | ||
*[https://www.youtube.com/watch?v=0Gi0cjtgO1o YouTube: How to use Makerware] | *[https://www.youtube.com/watch?v=0Gi0cjtgO1o YouTube: How to use Makerware] | ||
| Line 63: | Line 72: | ||
*[https://www.simplify3d.com/support/print-quality-troubleshooting/ https://www.simplify3d.com/support/print-quality-troubleshooting/] | *[https://www.simplify3d.com/support/print-quality-troubleshooting/ https://www.simplify3d.com/support/print-quality-troubleshooting/] | ||
*[http://reprap.org/wiki/Print_Troubleshooting_Pictorial_Guide http://reprap.org/wiki/Print_Troubleshooting_Pictorial_Guide] | *[http://reprap.org/wiki/Print_Troubleshooting_Pictorial_Guide http://reprap.org/wiki/Print_Troubleshooting_Pictorial_Guide] | ||
| − | |||
| − | |||
| − | |||
== Examples == | == Examples == | ||
Revision as of 14:35, 16 June 2016
English • Deutsch • français • español • íslenska • 日本語 • Nederlands • norsk bokmål • galego • føroyskt • Türkçe •
Contents
Overview
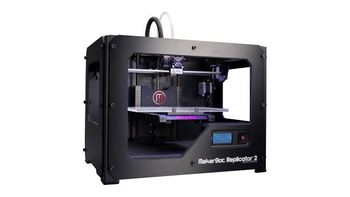
The Makerbot Replicator 2 is a desktop 3D printing machine. This machine can print out sculptures with a maximum height of 15 cm in PLA filament. You will need to prepare a 3D model in the shape you want to print and export this as .obj or .stl format.
Technical specifications
| Makerbot Replicator 2 | |
|---|---|
| Maximum build volume (mm): | L 285 X W 153 X H 155 |
Software
*Makerware Use this software at home to check printing time estimation
- Thinkercad online drawing tool, good for first time leaning
- Sketchup Good for furniture-like projects
- Fusion360 Possible to set parameters and relations to you design
- Blender For making/editing complex (mesh) sculptures
- Rhino 3D Not open source, but available on computers in the Fab Lab Reykjavik
- 123D catch to create a 3D model from photo's
- Memento Updated version of 123d Catch
- Shapeshifter simple online tool for making geometric shapes
- Thingiverse Manny free 3D models, shared by users
Usage machine
Portal:Safety: Do not put your hands near the printing nozzle unless you are sure that the machine is not going to move. And be aware that it has a heating element. Hot!
How to prepare for 3D printing
- To prevent printing issue's, make sure that your design is a 'water tight' object.
- Export your design as .STL or as .OBJ
- Inport your file to Makerware program. ( View: How to use Makerware )
- Set up your settings, then check printing time estimation.
- Export file as X3G format and copy that to SDcard of 3Dprinter to start printing.
Settings Makerware
- Devices > Select type of device > Replicator 2
- Settings button > Set up the 'Quick tab'
- Print quality > LOW ( result example print )̈
- Raftː turn on if needed (extra platform beneath your design)̈
- Supportː turn on if needed (print creates support columns beneath overhangs in your design)̈̈
- Layer height/infill/number of shells can stay on default settings
Tutorial
Exporting
Troubleshooting 3D printer
- https://www.youtube.com/user/makerbot/videos
- https://www.simplify3d.com/support/print-quality-troubleshooting/
- http://reprap.org/wiki/Print_Troubleshooting_Pictorial_Guide
Examples
Photostream ː More project examples here.


