Inkscape how to make a pressfit design/is: Difference between revisions
Created page with "{{languages|Inkscape_pressfit_hönnun}} File:Press-fit-Construction-Kit_3.jpg|thumb|right|300px|Dæmi um ,,pressfit" hönnun: [http://www.instructables.com/id/Press-fit-Co..." |
m Translating |
||
| Line 7: | Line 7: | ||
== Að skilja virkni laserskerans == | == Að skilja virkni laserskerans == | ||
Laserskerinn sker með því að brenna í burtu svolítið af efni. | Laserskerinn sker með því að brenna í burtu svolítið af efni. Laserinn fylgir miðju vektorlínunnar og brennir í burtu 0,1 mm hvoru megin við línuna. | ||
Athugið! Ólík efni og ólíkar stillingar í lasernum geta haft áhrif á hversu mikið efni er brennt í burtu. | |||
[[File:laser-cutting-example.jpg|400px]] | [[File:laser-cutting-example.jpg|400px]] | ||
''' | ''' ,,Brennir í burtu 0,2 mm af efni" - þetta er viðmiðun, ekki algild regla!''' | ||
Þegar hönnunin þín er tilbúin fyrir laserskurð skaltu fyrst prófa að skera hluta hennar og mæla hvort allt passi - áður en þú skerð út alla hönnunina. | |||
Því þú sóar miklum tíma og efni ef þú gerir bara ráð fyrir að allt gangi upp. | |||
=== Inkscape | === Inkscape dæmi: stærðir === | ||
Hér sérðu ferning sem teiknað er í stærðinni 50 mm x 50 mm. | |||
[[File:laser-cutting-example_2.jpg|400px]] | [[File:laser-cutting-example_2.jpg|400px]] | ||
En eftir að ferningurinn er skorinn út í leasernum er raunveruleg stærð hans EKKI lengur 50 mm x 50 mm, heldur 49,8 mm x 49,8 mm því laserinn er búinn að fjarlægja 0,1 mm af efni af hverri hlið. | |||
=== | === Munurinn á ,,fill and stroke" þegar kemur að málsetningum === | ||
Farðu í object > fill and stroke | |||
Hér getur þú breytt fyllingunni (fill) á hlutnum þínum og þykkt línunnar (stroke) í kringum hlutinn. Ef þú ætlar að hanna eitthvað þar sem stærð skiptir máli (eins og þegar gert er ,,press-fit") er mælt með því að teikna hlutinn með fyllingu (fill) eingöngu. Það er vegna þess að ef hluturinn er með línu (stroke), þá bætir Inkcsape línuþykktinni við stærð hlutarins. | |||
=== | === Dæmi um muninn á ,,fill and stroke" === | ||
Teiknum kassa í stærðinni 50 x 50 mm og höfum línuna (stroke) í þykktinni 2 mm. | |||
Ef þú skoðar stærðina á kassanum sérðu (ath. þú þarft að vera í kassa-tækjastikunni) getur þú séð að hann er enn 50 mm. | |||
[[File:laser-cutting-example_3.jpg|400px]] | [[File:laser-cutting-example_3.jpg|400px]] | ||
| Line 54: | Line 52: | ||
En ef þú notar tækjastikuna með svörtu músinni til að velja kassann þinn, sérðu að línubreiddin er í raun innifalin í stærð hlutarins, hann er því í raun í stærðinni 52 x 52 mm. | |||
[[File:laser-cutting-example_4.jpg|400px]] | [[File:laser-cutting-example_4.jpg|400px]] | ||
Revision as of 13:43, 11 February 2015
English • Deutsch • français • español • íslenska • 日本語 • Nederlands • norsk • galego • føroyskt • Türkçe •

Að skilja virkni laserskerans
Laserskerinn sker með því að brenna í burtu svolítið af efni. Laserinn fylgir miðju vektorlínunnar og brennir í burtu 0,1 mm hvoru megin við línuna.
Athugið! Ólík efni og ólíkar stillingar í lasernum geta haft áhrif á hversu mikið efni er brennt í burtu.
,,Brennir í burtu 0,2 mm af efni" - þetta er viðmiðun, ekki algild regla!
Þegar hönnunin þín er tilbúin fyrir laserskurð skaltu fyrst prófa að skera hluta hennar og mæla hvort allt passi - áður en þú skerð út alla hönnunina.
Því þú sóar miklum tíma og efni ef þú gerir bara ráð fyrir að allt gangi upp.
Inkscape dæmi: stærðir
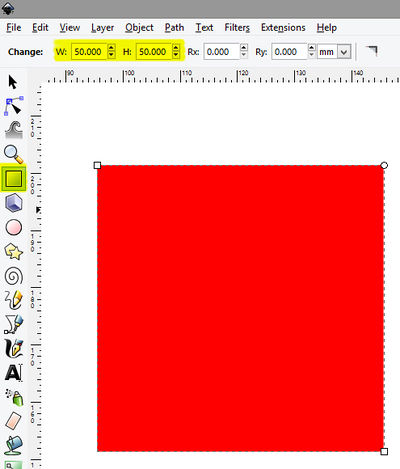
Hér sérðu ferning sem teiknað er í stærðinni 50 mm x 50 mm.
En eftir að ferningurinn er skorinn út í leasernum er raunveruleg stærð hans EKKI lengur 50 mm x 50 mm, heldur 49,8 mm x 49,8 mm því laserinn er búinn að fjarlægja 0,1 mm af efni af hverri hlið.
Munurinn á ,,fill and stroke" þegar kemur að málsetningum
Farðu í object > fill and stroke
Hér getur þú breytt fyllingunni (fill) á hlutnum þínum og þykkt línunnar (stroke) í kringum hlutinn. Ef þú ætlar að hanna eitthvað þar sem stærð skiptir máli (eins og þegar gert er ,,press-fit") er mælt með því að teikna hlutinn með fyllingu (fill) eingöngu. Það er vegna þess að ef hluturinn er með línu (stroke), þá bætir Inkcsape línuþykktinni við stærð hlutarins.
Dæmi um muninn á ,,fill and stroke"
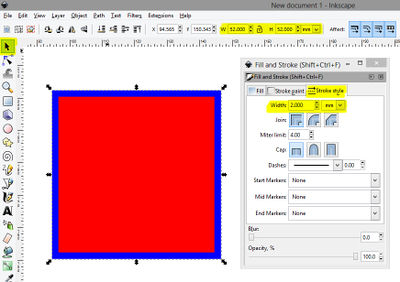
Teiknum kassa í stærðinni 50 x 50 mm og höfum línuna (stroke) í þykktinni 2 mm.
Ef þú skoðar stærðina á kassanum sérðu (ath. þú þarft að vera í kassa-tækjastikunni) getur þú séð að hann er enn 50 mm.
En ef þú notar tækjastikuna með svörtu músinni til að velja kassann þinn, sérðu að línubreiddin er í raun innifalin í stærð hlutarins, hann er því í raun í stærðinni 52 x 52 mm.
Step by step in inkscape
Let's say we want to make something like in this image. Cutting out 2 pieces with a slot, that (press) fit together.
1. Create a large box (50 x 50 mm)
2. Measure you plate of material.
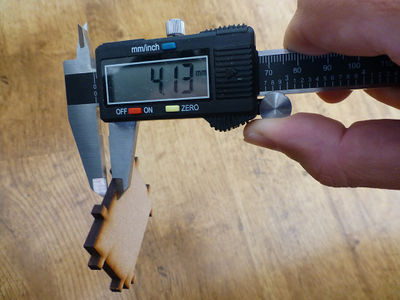
The MDF you see in the photo is a standard plate of 4 mm thick, but if you measure it you can see that it's actually 4,13 mm.
Measuring really matters!
3. Create a smaller box that overlaps the first, and give it a width of your measured plate.
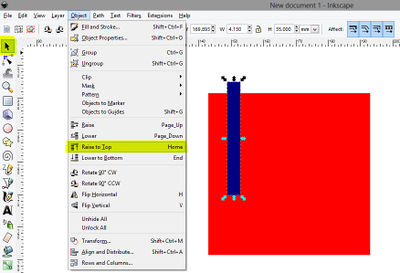
4. If the smaller box is behind the bigger box you can let them swith places by selecting the shape you want to move to the front, and go to Object > Raise to Top
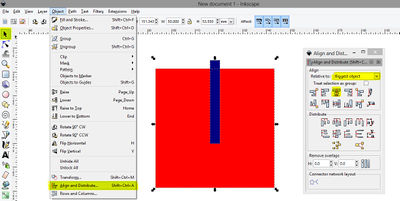
5. To get the smaller box nicely centered. Go to Object > Align and Distribute.
First select both shapes, then choose in the Align and Distribute menu 'biggest object' and click on 'center on vertical axis' button.
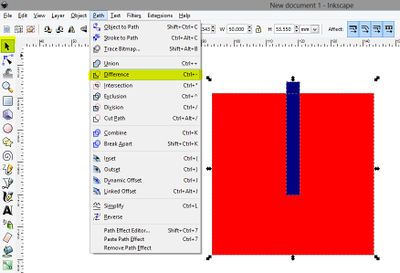
6. Now let's subtract the blue box from the red one to finish the design.
Select both shapes. Go to Path > Difference.
Now you design is ready, final step is to prepare it for the laser cutter.
Offsetting the line
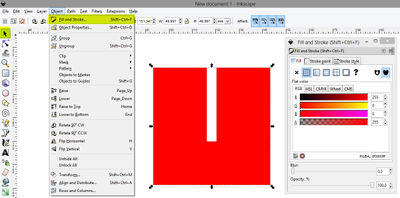
7. Select your design and and go to Object > Fill and stroke
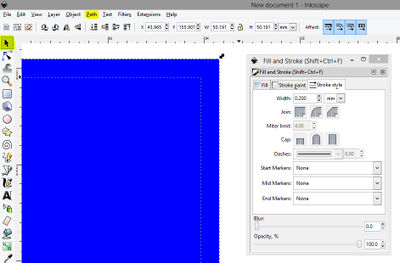
8. Go to the stroke paint tab and set a color. (click on the box)
9. Then go to the stroke style tab and change the line width to 0.2 mm
10. (While your object is still selected) in the menu choose Path > Stroke to path
11. (While your object is still selected) next select Path > break apart.
Your object should now have adopted the color from your stroked line (in my case blue), and (if you zoom in) you should see 2 dotted lines around your object.
12. (While your object is still selected) go to the fill tab of the fill and stroke menu.
And turn off the fill by clicking on the X.
13. Then set the stroke again in the stroke paint tab. (click on the box).
14. Back to the stroke style tab and set the line width to 0.01 mm
15 You double line is still one object. Go to menu > path > break apart to separte the two lines.
16. Deselect everything by clicking outside your shape (no more dotted lines)
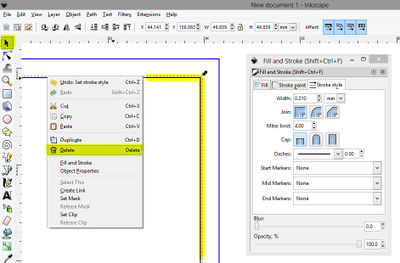
17. Now select the innermost line of you object and delete that line (right mouse button).
Beware. If you design has a hole in it, then you should offset that line to the inside. Steps are the same but delete the outside line then instead.
18. Now the laser cutted shape should fit together nicely.

