Final project: Difference between revisions
| Line 105: | Line 105: | ||
<br> | <br> | ||
26.2.2016 Yesterday i begun my quest on finding out how to use SketchUp. We are still not friends, but we get along so o speak. I managed to create a 3D model of a tablet weaving shuttle. The first attempt didn't have quite the right dimensions. The front was too wide and the other end too narrow leaving too little room for the yarn. Changing the model turned out tricky for me, it was a journey of a lot of trials and errors. The shuttle number two is now printing in the MakerBot, it takes about a half an hour still. I'm excited too see how it turns out! We're printing Henna's design at the same time, so it'll be nice to see that as well. | 26.2.2016 Yesterday i begun my quest on finding out how to use SketchUp. We are still not friends, but we get along so o speak. I managed to create a 3D model of a tablet weaving shuttle. The first attempt didn't have quite the right dimensions. The front was too wide and the other end too narrow leaving too little room for the yarn. Changing the model turned out tricky for me, it was a journey of a lot of trials and errors. The shuttle number two is now printing in the MakerBot, it takes about a half an hour still. I'm excited too see how it turns out! We're printing Henna's design at the same time, so it'll be nice to see that as well. | ||
<br> | <br> | ||
Totally unrelated observation: The first model works really well as a windscreen scraper. Better than the real one we have. So it was useful in the end. | Totally unrelated observation: The first model works really well as a windscreen scraper. Better than the real one we have. So it was useful in the end. | ||
Revision as of 12:06, 26 February 2016
Portable Spinning wheel
The need

Last fall semester we had a small course on spinning in my school and I absolutely fell in love with it. We started out with a spindle and advanced to a spinning wheel when we had understood the principle of spinning. I spun with a traditional spinning wheel and with a more modern upright spinning wheel. I preferred the upright version so my teacher brought me a travel spinning wheel from an other department so that i could try that out too. It was an Ashford model and relatively small and handy to take to go so I started googling the prices.That was a mistake, I almost fell from my chair. The Asford's models are really expensive and there are not so many global or local manufacturers that make spinning wheels let alone travel ones. I got an old spinning wheel from my mother but the problem with those are that they're really big and hardly not portable. A spindle is of course easy to take along, but I would really like to have a proper spinning wheel that's just as easy to grab on the go.
The inspiration
I started looking for small spinning wheels that people had made by themselves or have had made by local carpenters or other craftsmen. I found a lot of models. The spinning wheel in the first picture is the Asford one I tried at school and which started all this. My absolute favorite is the one called pumpkin. A 91-year-old carpenter made it for the lady hosting the blog i found it from based on her needs and general requirements for a spinning wheel. It measures only 17 inches and is extremely adorable. It isn't however not very portable, since you can't take it apart. It's a solid piece. And what i wan't from my s.w. design is the same level of compact design with the capability to take it a part to make it really easy to take with me.
-
 Asford Spinnig wheel
 -
 Gaskell spinning wheel, Kathryn
 -
 Pumpkin
 -
 Spinning wheel by SpinOlution
 -
 Pic from Pinterest, didn't have a source
 -
 Pic from Pinterest, didn't have better source than it's from Etsy
 -
 Spinning Wheel by Woolthing


The research
So after I had decided what size and shape I would like my laser cut spinning wheel to be, I started looking if there's already laser cut models or prints available. A company called Ponoko that makes laser cut spinning wheels called Electric Eel Wheel. They are electric spinning wheels, so you don't have to manually spin the wheel with your foot. That would be a great addition to my, yet not existing, design. The E.E.W.'s cost around 250$, which is again, really expensive. I couldn't find a whole lot more manufacturers outside Ponoko. There's a lot of models and pictures on Pinterest, but they don't have sources or the source is just Etsy so it's basically impossible to find who's the maker of the spinning wheel or the design of one. I expanded my search and just began to wonder around internet and found amazing tiny laser cut looms. I might have to look into that too. Tiny little tabletop loom would be so great. The laser cut loom on the picture below, is actually made in Fab Lab Amsterdam by Steven Sambell. There's also a webpage/project called Open source Jacquard Loom, where you have to sign up to look at the models. The OSLOOM in general is a project aimed at creating an open source electromechanical thread-controlled floor loom that will be computer controlled. The loom itself will be a Jacquard style loom. Jacquard looms allow for the individual control of each thread which in turn allows for photographic imagery to be woven. Jacquard looms like this exist commercially but they are very expensive (upwards of $30,000) which puts them out of reach for individuals and small educational facilities. The OSLOOM could be produced way more economically than that and truly revolutionize what the studio weaver could accomplish. The idea of a DIY open source loom is one that not only artists could benefit from but many individuals and learning centers could gain a resource by building one of these looms as well. So might sign up for that and keep an eye out for updates on the matter. Pinterest is of course filled with pictures of self made looms also, but the sources are just as bad. There were many pictures of really tiny laser cut hand weaving looms that were absolutely adorable. There are a wide number of sellers in Etsy who make those small looms for relatively cheap price. From looms I naturally moved tho waving supplies like shuttles etc. Googling them was actually quite hard, since I didn't know the correct terms for all the supplies. Found a couple of pictures but not really any sources or manufacturers. But the idea if making my own weaving supplies is tempting due their high prices.
When it comes to spinning wheels, I found that if they're not electrical there is too options. There are the models with only one pedal, like the traditional finnish model, and the ones with two pedals. I had absolutely no idea what's the advantage or disadvantage of having two pedals, so I looked it up. Apparently there's not much difference between having only one pedal or two pedals. Paddling might be easier with two pedals, since you need less force to make the wheel spin. It also spins more evenly. The rhythm however is easier to maintain with a single pedal. For a beginner a two pedal version is usually better, since you don't have to focus on your foot so much. I'm still considering strongly making my design electric, but if that's too hard for me or too expensive, I'll make my design probably with two pedals.
When it comes to the machines in general, I really think our school should get some of them. The vinyl cutter with the heat press and of course the laser cutter would be so useful and helpful, the things and designs we could do then. A lot of the students like to deign jewelry, so the laser cutter would help us manufacture them easier for sale. It would also make felt cutting a lot easier, so the amount of products made out of felt would increase. And of course with the vinyl cutter we wouldn't have to do screens for every single design by hand, and we could even do some of the patterns with the heat press. The machines are expensive thou and we just got the TC2 Jacquard loom, which should be used more in my opinion. But little by little in the near future maybe. We already have a 3D printer in our school, but it's not my department ans nobody knows how to use it yet.
-
 A complete E.E.W.
 -
 The parts for E.E.W.
 -
 The electrics of an E.E.W.
 -
 A small laser cut loom by Steven Sambell
 -
 Tiny tiny hand weaving loom from Pinterest
 -
 Laser cut acrylic weaving supplies from Pinterest
 -
 Laser cut wooden weaving supplies from Pinterest


The harsh reality
After I did my research, looked at the calendar and assessed my skills, I have come to the conclusion, that at this time and in this time window the spinning wheel project might be a little too much for me to handle. My Brain is already going into override and since I have some other worries besides the project, I'm going to downsize it a bit. Thankfully, I can always do the project at home and visit the Fab Lab in Aalto university and finish it there.
Portable table loom
The need, inspiration and research
So now that we've put the spinning wheel behind us let's focus on what should I actually do for my project here then. I fell in love with the little table loom made in Fab Lab in Amsterdam, but in my mind it's a little too small and the fact it has no warp beam or the beam in the back that gathers the ready fabric. So What I now have in mind, is an improved version of the table loom. I want to make it a little wider and add the beams so you can make long scarves or table runners. I would also like to do some shuttles and other supplies for the loom. I am still going to do the niddy-noddy part of the original project thou. Like before I started by doing some research on small table looms that are already on the market and finding inspiration. Ashford is again a big manufacturer but there's also a smaller company called Cricket loom that makes pretty good looking looms. The main issue, again, is the prices. They are really expensive starting from 100 $ and reaching almost 300$. In Finland the only manufacturer is again Toika, and to prices even for teeny tiny children's looms are over 140 €. All of the looms i found, have the beams which is really good. Then you don't have to limit your design to a certain length so it's easier to make scarves etc. Pinterest was of course an excellent source for pictures, but the sources of the pictures were sometimes really hard to find as usual. From Pinterest I actually found a third commercial table loom called Bastidor salma -38. The site was in spanish, so I didn't understand the most of it, but it had an interesting technique how to change the shed. Why do we need table looms you might ask? Not everybody wants to weave something huge like rugs or blankets, so we don't always need a proper loom. Looms are also really big, heavy and definitely not portable. I have room for a loom in my house but if you live in a small apartment there's no way you can fit one in your living room. So a portable loom that you can weave table runners and scarves with and that fit's on your kitchen table would be really handy. And it's even better if you can make it yourself and don't have to order one from abroad and pay tons of money for it.
-
 The Asford Rigid Heddle Looms
 -
 Cricket Looms version
 -
 Bastidor Salma -38
 -
 Self made loom from Pinterest
 -
 Table loom by Toika


The great idea
As i was looking through our vocational qualifications I realized that my project doesn't actually fit very well in my original module, so I scrolled through the PDF looking for one that I could fit it in. We were brainstorming with my friend Henna and then it hit me. Maybe the loom itself isn't really the end result of the process. Maybe I could instead of a product provide a service. I was thinking about creating a course/workshop where i could teach people how to design their own craft supplies like looms and shuttles with InkScape or other programs, and then at the end of the course we would visit a Fab Lab and they could make them by their own design. Since commercial supplies are often ridiculously expensive I think there would be many interested parties such as schools, adult education centers and small clubs. There could also be activities for children, like making and decorating your own tiny loom like the ones I found on pinterest and weaving little coasters or doll house rugs with those.
The basics of the workshop
I want the workshop be easily accessible and not too time consuming. I was thinking about once a week for six weeks and about 2-3 hours at a time. I would like the participants to load InkScape on their home computers so they can work with the file outside the workshop. First two meet ups would be about designing and learning how to use the programs. By the third meet up they should have first drafts ready and we could visit a local FabLab and they could make their first prototypes out of cheaper materials. Then we would have two meet ups for tweaking the design and the last time they would be able to make their final products from the material of their choosing. If the workshop would run under an adult education center, the lessons could be held in the local school's computer classroom and a laptop wouldn't be required. Otherwise it will be a problem to find a space with enough computers for all the participants if they do not have laptops of their own. The course fee would consist of the rent of the classroom and my fee. Material costs is another thing. I could have a small supply of MDF, plexiglass and plywood that they could buy, but they could also buy the material on their own or from the FabLab when we visit there. Like I said before, the workshop could be kid friendly, so I would have a ready-made tiny loom model that they could decorate the way they want. We would make it on the first FabLab visit and then the kids could make their little weaving projects on the next lessons.
Laser cut niddy-noddy
The need

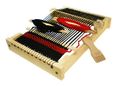
If the term "niddy-noddy" seems strange, let's start with some wiki-info. So, a niddy-noddy (plural niddy-noddies) is a tool used to make skeins from yarn. It consists of a central bar, with crossbars at each end, offset from each other by 90°. The central bar is generally carved to make it easier to hold. Either one of the crossbars will have a flat edge to allow the skein to slide off, or will be completely removable. Again there aren't so many manufactures who make these, in Finland we have only one, Toika, whose niddy-noddy is on the picture on the left. They cost quite a lot 'cause there's no real competition. The other big manufacturer whose niddys you can buy in Finland, is of course Ashford, but they are just as expensive.
The inspiration
With a quick google search and some pinning on Pinterest I found a lot of pictures about laser cut niddy-noddys and immediately decided to make my own design, made to fit my hand perfectly. The key in making a good niddy-noddy is to have the other end either turnable or like the wiki article said, with a flat edge so it's easier to take the ready skein off. In many design this had not been taken into consideration. Not even in the laser cut Asford model. I found many of the laser cut models also quite harsh on their design, and by that I mean not hand friendly. I want to make it as comfortable to use as possible. There were also many instruction on niddy-noddys made out of PVC-pipe, but those models have a tendency to get loose and bend.
-
 Traditional Ashford niddy-noddy
 -
 Ashfords travel niddy-noddy
 -
 One Yard laser cut niddy-noddy
 -
 Pic from Pinterest, no source
 -
 A niddy-noddy made out of PVC-pipe


The process
15.2.2016 Today i started designing my own niddy-noddy. I begun with a rough shape and cut it out of thin cardboard. I wanted to get an idea what the niddy should feel and what size it should be. The first model was a little too wide on the gripping part and the head was too narrow. I also forgot to make one of the ends curve downwards so the skein is easier to remove. So back to the drawing board. Second one was a lot better but i still wanted to make the head wider. Third time i was happy with the design and just added some decorative touch for the fourth one. Next phase is to make a prototype out of MDF. On the finished product I would prefer wood, since MDF isn't really healthy for you, but i might have to go on a little shopping trip for that.
-
 1st
1st -
 2nd
2nd -
 3rd
3rd -
 4th
4th -
 The design


3D printed shuttle
26.2.2016 Yesterday i begun my quest on finding out how to use SketchUp. We are still not friends, but we get along so o speak. I managed to create a 3D model of a tablet weaving shuttle. The first attempt didn't have quite the right dimensions. The front was too wide and the other end too narrow leaving too little room for the yarn. Changing the model turned out tricky for me, it was a journey of a lot of trials and errors. The shuttle number two is now printing in the MakerBot, it takes about a half an hour still. I'm excited too see how it turns out! We're printing Henna's design at the same time, so it'll be nice to see that as well.
Totally unrelated observation: The first model works really well as a windscreen scraper. Better than the real one we have. So it was useful in the end.
-
 The first 3D model I've ever made
 -
 The first model printed
 -
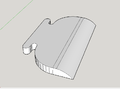
 The edited 3D model of a tablet weaving shuttle


