Giftproject
Since everything is rather expensive here and I'm on a budget, I decided that instead of buying my friends homecoming gifts, I would make them with the laser cutter out of the scrap MDF and plexiglass that we can use freely. For most of my friends I will do earrings, since they are simple and easy to do and the can be done even from tiniest scrap pieces. For my husband, my goddaughter(Jemina) and her mother I wan't to do something bigger and more special. I have a couple of ideas for Jemina but none for her mother or my husband. But thankfully I still have time. Eight weeks of it.
Earrings
There are five friends I want to treat with a little pair of earrings. My best friend Heidi is going to get a pair of green plexiglass Snufkins. I actually even have the vector design for that one already, since Marko cut one out of his name tag. So that one's half way through. For our mutual friend Maria I would like to design something vintage inspired, not sure what exactly. Veera and Maarit are my classmates from school. Veera is a photographer and Maarit is now studying to become a physiotherapist, so I would like to make them earrings that resemble them. Veera might get a pair of cameras but for Maarit I will probably do a design that's a little more on the crazier side. For my newest friend Anne I wanna make something related to cows. Her last name is Kanttura and finnish that's a nickname for cows. And of course, if I have the time and energy, a couple of more earrings for myself wouldn't hurt. Tardis or Daleks maybe...
Making of
11.2. So today started out quiet so I found this a good time to continue my earring project, from the laser cutting part at least. I chose most of the pictures, edited them in InkScape and made a pdf of all of them. I then chose the materials. First I was thinking about wood, but decided to go with plexiglass instead. I picked the suitable color for each design and started cutting. I was really happy with the results. Laser cutting earrings is also really fast, it only took about 3 minutes per pair. When I get back to the apartment, i'll add little lava beads on every one and the hooks of course and they'll be finished! They will all have a little peace of FabLab and a little piece of Iceland on them. I still have two more pairs to do, cause I didn't find the perfect pictures yet, but I'll update the progress when i get there.
11.3. One month later and I'm back at doing almost the same thing. This time managed to scavenge some awesome scrapmaterial that I had to use! I made this cool wasp wing styled earring design and cut it out of wood earlier. This time I cut it out of neon yellow plexi glass, which is a really cool material to use. I did a couple of test with other plexis cause i had a limited amount of the good stuff. But the earrings turned out really good! I also made a necklace shaped of a death's-head hawkmoth.
-
 All the designs
 -
 Snufkins
 -
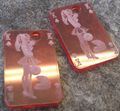 PinUp-girls
 -
 Daleks (for me)
 -
 Cows
Cows -
 Cameras
 -
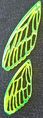 My neon wings, ready to spread out
 -
 White test hawkmoth, antlers were too narrow, they broke off
 -
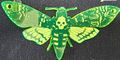 Neon hawkmoth, how cool is this seriously


Goddaughter and her mother
I found these lovely animals and trees made out of MDF on Pinterest and I would really like to do a little set of forest animals and props for My doddaughter. She would really like those. For her mother I also want to do something special since she has helped me so much during this spring. She's also a very dear friend of mine. One idea I had was a jewelry box of sorts, but I think that's a little too big of a projects, since I also have to do my own project, the portable spinning wheel. Or at least try to do that. You can read on the Learning how to press fit -section how I tested the shapes for the different animals and what press fit actually means. UPDATE: I Finally came up with an idea for Maiju, Jemina's mother. I'm gonna engrave her a picture collage about her daughter. I did a test today with cardboard, to try which images engrave well and which doesn't. The final picture is going to be made out of wood.
11.2.2016 So today i finished the design for the living hinge bos I'm gonna put my goddaughters animals to. I still have to find the perfect material and ten adjust the press fit parts, but otherwise I'm good to go.
-
 Beatiful trees made by Crate and Barrel, a company in Boston
 -
 Animals by Crate and Barrel
 -
 The design for the box


Doing some practise
I wanted to do some practice before the actual earring project. As I mentioned on my small introduction, I have a dog. A welsh corgi cardigan called Roope. He is a wonderful and cheerful little dog who loves food more than anything and also loves to eat snow. For my last school project I edited a photo I took of him couple of winters ago (after he had been caught eating rabbit poo) and thought I should make something out of that here as well. I've already used the photo for weaving, I made some designs with the TC2 Jacquard loom in our school. They turned out really good, you can find pictures in my portfolio blog, Nahkaa ja nappeja at wordpress. So what to do with the picture then? I might do a pair of earrings also, but I decided to start with a bookmark sort of think. It will have a badge with his picture at the other end, leather cord in between and something wooden on the other end also. So I started with trials with MDF, which is not going to be final material for the earrings at least, but so I get more familiar with the cutter and finding out what changing all the different settings does to the image. The final material will be some kind of wood for sure, not just sure yet what. I'll have to look through the scrap pile. I did four test and the results are visible below and so are the info about the settings I used.
-
 The original picture
 -
 The edited picture
 -
 The bookmark design
 -
 The picture engraved with different settings
 -
 The settings for the engravings


Learning how to press fit
The animals
In order to make the wooden animal for my goddaughter, I have to learn how to cut things that press fit. Press fit means that the joint between the pieces is so snug that no glue is needed but you can still take them apart. The average amount that the cutter burns away material is about 0,2 mm. 0,1 mm on each side of the laser. I begun my trials with cardboard since it's the cheapest material to use. First I measured the thickness of the cardboard with a caliper; 2,8 mm. So the basic guideline is to make the joints 0,2 mm smaller than that number. I did a small test joint to see weather the 0,2 mm is enough or too much difference. Test pieces are really helpful and they save a lot of material in the end. I found out that the 0,2 mm isn't quite enough, so I made the gaps 0,3 mm thinner and the press fit came out perfect. After my tests I made a really simple fox design, added the joints and went to the cutter to make my 2D forest animal into 3D(ish). The model turned out okay, not perfect but okay. I edited my fox's butt and tummy, made him a little leaner and the second version is now something I can be pleased with. The next animal I designed was a deer. Again, first try wasn't quite there, the back legs were a little too short. So I'll just have to edit those a bit. Also the one ear pointing backwards looked silly so I am gonna add the ears onto the antler piece. I might add separate ears to the fox too, but I also want to keep the maximum amount of pieces as four so my goddaughter will be able to assemble them herself. Bear was actually the hardest animal for me to do. I was happy with the body's shape right away, but the legs took me some time and thinking. Bear is such a round animal and it has to have some bulkiness to it. My first attempt was a disaster proportion-wise. I didn't even want to assemble it for the picture. The second attempt on the bear was slightly better, but only very very slightly...
11.3. A couple of days ago I made my final animals out of wood. I decided to go with the fox and the derr, since those were my favorite. I still made couple of small changes on the designs. I made the deer's antlers thicker to prevent braking and made the fox more natural looking and less cartoonlike.
I also designed a box for them with a living hinge lid. I chose more natural wood instead of MDF, because that stuff isn't really healthy for you and my animals are a gift for my goddaughter. I had to bend the lid of the box really carefully so it wouldn't brake. I used regular wood settings for cutting (12/100/500) but i rastered it twice with 45/100/500 to prevent burn marks but still reaching the wanted darkness.
-
 test piece with 2,6 mm gaps, too loose
 -
 fox number one
 -
 The leaner meaner fox machine
 -
 both foxes side by side
 -
 deer with too short back legs and the weird ear
 -
 front view of the fist deer
 -
 the second version of the deer
 -
 the very very badly proportioned first bear
 -
 the second also very badly proportioned bear
 -
 Finished Fox and Deer


.JPG)


Little gifts for just me
I haven't made a lot of things for myself on my stay at Fab Lab, but during the last week i managed to squeeze some me-time in. I started by roaming around pinterest and found a lot of amazing designs for mobiles. Things you usually hang over a child's bed. I really like them in general, like wind chimes. So I begun designing one with ocean theme. The top part is shaped like an octopus, cause it's easy to hang things from the tentacles. The dangling bits are mermaids, whales, seahorses and seals. I wanted it to have little quirk, so not just fish etc. The size of the whole thing was determined by the maximum sheet size the laser cutter can cut which is 30*60 cm. So everything had to fit to one plate cause i didn't want to buy two plates. I chose white plexi glass, cause it's a really neutral color. I made pressfit tests first and just went with it. I used regular plexi settings for the cutting, 12/100/5000. Everything went well. I showed Linda my design and she really liked it and asked if I could make one for the Lab as well. She gave me this really thick plexi i could work with. It a was beautiful gray shade and 8 mm thick. The recommended setting for 6mm plexi is 8/100/5000. We started with speed being just 5, but it still didn't cut through. We made a second pass and result was good. I tried to make the process a little faster by taking the speed to 8 and doing two passes with that, but the edge wasn't as smooth as with the previous settings, so we decided to stick with the really low speed. I cut the dangling bits out of normal clear plexi glass, so there the cutting wasn't an issue. I assembled the mobile yesterday and it looks so delicate and nice. I really like it and I really look forward on going home and putting my own version together.
I also made myself a top with my favorite quote from J. R. R. Tolkien, the writer of The Lord of the Rings. I made another design with the gate of Moria, but I forgot that shirt back at the apartment.
-
 The mobile I made for the Lab
 -
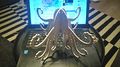 the octopus for my mobile
 -
 The bits for my own mobile
 -
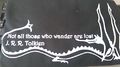 Top with the quote


