Eagle: Difference between revisions
Jump to navigation
Jump to search
No edit summary |
http://academy.cba.mit.edu/content/tutorials/eagle/eagle_resources.html |
||
| Line 1: | Line 1: | ||
See version in Icelandic [[ | See version in Icelandic [[Eagle kennsluefni]] | ||
[[Image:Eagle-SchematicMenu.jpg|right|Eagle-SchematicMenu.jpg]] | |||
== Download and install Eagle == | |||
*[http://www.cadsoftusa.com/download.htm Download Eagle] | *[http://www.cadsoftusa.com/download.htm Download Eagle] | ||
==Designing circuits with Eagle== | == Designing circuits with Eagle == | ||
Open Eagle | |||
*Select New Project | |||
*Select New Project | |||
*Select New Schematic | *Select New Schematic | ||
Open library | Open library | ||
*Select'''Add''', then you can open the library | *Open library, click '''Use''' | ||
**(if you don't find your thing you could also click on | *Download from the internet a library or select on in the computer the library that we will be using (e.g. NG.lbr[http://fab.cba.mit.edu//about/fab/] or the one from Sparkfun.lbr ([http://www.opencircuits.com/SFE_Footprint_Library_Eagle] version 2011 ( [https://github.com/sparkfun/SparkFun-Eagle-Library/blob/master/SparkFun.lbr?raw=true right click on this link, save link as]) | ||
*Select'''Add''', then you can open the library | |||
**(if you don't find your thing you could also click on "Use") | |||
*Open NG.lib library for Fab Lab projects. | *Open NG.lib library for Fab Lab projects. | ||
<br> [http://www.cadsoftusa.com/Tour/tour00.htm Tour for the Eagle on CadSoft site] | |||
<br> | |||
*Select the things you want to use and click '''Add''' to get the components. | |||
*You can select different view by clicking on '''Board''' | |||
*You can select object by rightclicking them and selecting packning | |||
*Connect objecs by clicking '''Wire''' and make wire between objects. | |||
*It can be good to make connections and get a sign for Ground and put where it should be GND. | |||
*View '''Grid''' select the size of the grid, it should be around (0,025 inches) | |||
*'''Move''' to move object or line. | |||
*'''Delete''' to remove object or line and so on. | |||
*'''Junction''' Connection point . | |||
*View '''Grid''' select the size of the grid, it should be around (0,025 inches) | |||
* ''' Move''' to move object or line. | |||
*'''Delete''' to remove object or line and so on. | |||
*'''Junction''' Connection point . | |||
**You can right click objects and select '''value''' to set values e.g. for capacitors or resistors | **You can right click objects and select '''value''' to set values e.g. for capacitors or resistors | ||
**Right click on object and select '''properties''' to rename. | **Right click on object and select '''properties''' to rename. | ||
**You can check out if you have connected the object by moving them. | **You can check out if you have connected the object by moving them. | ||
*'''ERC''' Error correction, search for errors. | *'''ERC''' Error correction, search for errors. | ||
===Arrange objects === | |||
=== Arrange objects === | |||
Add | Add | ||
*'''Frame''' to make frame around the design. | |||
*'''Frame''' to make frame around the design. | |||
*Arrange objects | *Arrange objects | ||
*click '''Auto''' | *click '''Auto''' | ||
**Select Bottom N/A | **Select Bottom N/A | ||
If it is not as good as you wanted you can select lines, by right clicking them and select '''rip off''' | If it is not as good as you wanted you can select lines, by right clicking them and select '''rip off''' | ||
<br> | |||
== Info about Circuits == | |||
*TX transmit | |||
*DTR data terminal ready | |||
*Rx Recieve | |||
*Miso -master in slave out | |||
*Mosi master out slave in | |||
*sck system clock | |||
*MOSI (3) GND (2) MISO (1) | | |||
* | *-RESET (4) SCK (5) | ||
* | |||
== Project 1 == | |||
*First project could be to make schematic of this board and to add something to it, add (at least) a button and LED (with current-limiting resistor) to the serial echo hello-world board, check the design rules, and make it | |||
*First project could be to make schematic of this board and to add something to it, add (at least) a button and LED (with current-limiting resistor) to the serial echo hello-world board, | |||
**[http://fab.cba.mit.edu/about/fab/hello/ftdi/hello.ftdi.44.png See the layout for hello.ftdi.44] | **[http://fab.cba.mit.edu/about/fab/hello/ftdi/hello.ftdi.44.png See the layout for hello.ftdi.44] | ||
*Download libraries | *Download libraries | ||
**NG.lbr[http://fab.cba.mit.edu//about/fab/dist/ng.lbr] | **NG.lbr[http://fab.cba.mit.edu//about/fab/dist/ng.lbr] | ||
**the one from Sparkfun.lbr ([http://www.opencircuits.com/SFE_Footprint_Library_Eagle] version 2011 ( [https://github.com/sparkfun/SparkFun-Eagle-Library/blob/master/SparkFun.lbr?raw=true right click on this link, save link as]) | **the one from Sparkfun.lbr ([http://www.opencircuits.com/SFE_Footprint_Library_Eagle] version 2011 ( [https://github.com/sparkfun/SparkFun-Eagle-Library/blob/master/SparkFun.lbr?raw=true right click on this link, save link as]) | ||
**[http://www.mikrocontroller.net/attachment/68243/atmel-new.lbr atmel-new.lbr, Attiny 44 library] | **[http://www.mikrocontroller.net/attachment/68243/atmel-new.lbr atmel-new.lbr, Attiny 44 library] | ||
==Links== | === Materials used === | ||
*[http://www.cadsoftusa.com/Tour/tour00.htm Eagle Tour] | |||
*[http://perso.numericable.fr/pboucheny/eagle3d/e_genpov.htm HOW TO GENERATE POV-RAY FILES WITH EAGLE] | *IC1 = ATtiny44_SOIC('IC1\nt44') -> see in atmel-new.lbr | ||
*[http://www.matwei.de/doku.php?id=en:eagle3d:eagle3d Eagle 3D] | *R1 = R_1206('R1\n10k') -> See in ng.lbr | ||
*[http://academy.cba.mit.edu/tutorials/eagle/eagle_resources.html http://academy.cba.mit.edu/tutorials/eagle/eagle_resources.html] | *C1 = C_1206('C1\n1uF') -> sparkfun.lbr | ||
*XTAL = Crystal 20 MHz -> search for crystal in ng.lbr | |||
*FTDI connector (6 pin) ->search for ftdi in ng.lbr | |||
*Header (2*3 pin) -> search for isp in sparkfun.lbr | |||
== Links == | |||
*[http://www.cadsoftusa.com/Tour/tour00.htm Eagle Tour] | |||
*[http://perso.numericable.fr/pboucheny/eagle3d/e_genpov.htm HOW TO GENERATE POV-RAY FILES WITH EAGLE] | |||
*[http://www.matwei.de/doku.php?id=en:eagle3d:eagle3d Eagle 3D] | |||
*[http://academy.cba.mit.edu/content/tutorials/eagle/eagle_resources.html http://academy.cba.mit.edu/content/tutorials/eagle/eagle_resources.html] | |||
== Videos == | |||
*[http://www.youtube.com/watch?v=qG0O9LKH-_E Cadsoft EagleCad Tutorial on Youtube] | *[http://www.youtube.com/watch?v=qG0O9LKH-_E Cadsoft EagleCad Tutorial on Youtube] | ||
[[Category:Software]] | [[Category:Software]] | ||
Revision as of 11:13, 6 March 2012
See version in Icelandic Eagle kennsluefni

Download and install Eagle
Designing circuits with Eagle
Open Eagle
- Select New Project
- Select New Schematic
Open library
- Open library, click Use
- Download from the internet a library or select on in the computer the library that we will be using (e.g. NG.lbr[1] or the one from Sparkfun.lbr ([2] version 2011 ( right click on this link, save link as)
- SelectAdd, then you can open the library
- (if you don't find your thing you could also click on "Use")
- Open NG.lib library for Fab Lab projects.
Tour for the Eagle on CadSoft site
- Select the things you want to use and click Add to get the components.
- You can select different view by clicking on Board
- You can select object by rightclicking them and selecting packning
- Connect objecs by clicking Wire and make wire between objects.
- It can be good to make connections and get a sign for Ground and put where it should be GND.
- View Grid select the size of the grid, it should be around (0,025 inches)
- Move to move object or line.
- Delete to remove object or line and so on.
- Junction Connection point .
- You can right click objects and select value to set values e.g. for capacitors or resistors
- Right click on object and select properties to rename.
- You can check out if you have connected the object by moving them.
- ERC Error correction, search for errors.
Arrange objects
Add
- Frame to make frame around the design.
- Arrange objects
- click Auto
- Select Bottom N/A
If it is not as good as you wanted you can select lines, by right clicking them and select rip off
Info about Circuits
- TX transmit
- DTR data terminal ready
- Rx Recieve
- Miso -master in slave out
- Mosi master out slave in
- sck system clock
- MOSI (3) GND (2) MISO (1) |
- -RESET (4) SCK (5)
Project 1
- First project could be to make schematic of this board and to add something to it, add (at least) a button and LED (with current-limiting resistor) to the serial echo hello-world board, check the design rules, and make it
- Download libraries
- NG.lbr[3]
- the one from Sparkfun.lbr ([4] version 2011 ( right click on this link, save link as)
- atmel-new.lbr, Attiny 44 library
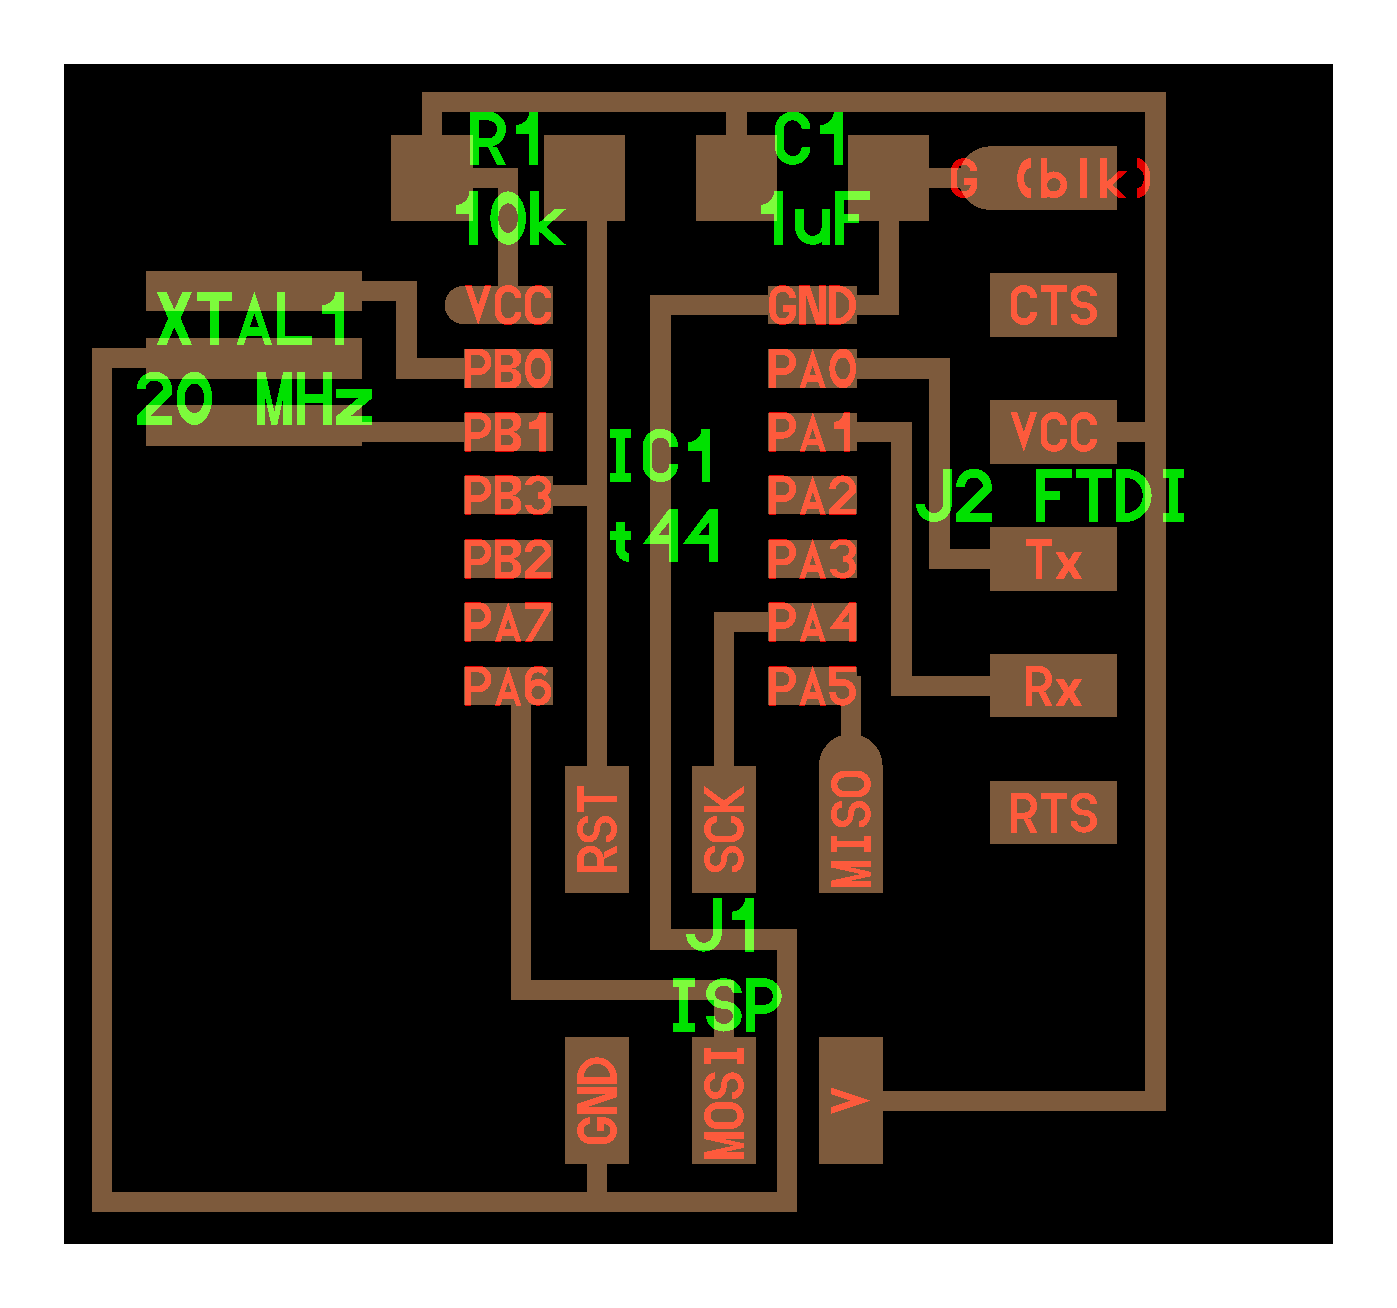
Materials used
- IC1 = ATtiny44_SOIC('IC1\nt44') -> see in atmel-new.lbr
- R1 = R_1206('R1\n10k') -> See in ng.lbr
- C1 = C_1206('C1\n1uF') -> sparkfun.lbr
- XTAL = Crystal 20 MHz -> search for crystal in ng.lbr
- FTDI connector (6 pin) ->search for ftdi in ng.lbr
- Header (2*3 pin) -> search for isp in sparkfun.lbr
Links
- Eagle Tour
- HOW TO GENERATE POV-RAY FILES WITH EAGLE
- Eagle 3D
- http://academy.cba.mit.edu/content/tutorials/eagle/eagle_resources.html