Difference between revisions of "Epilog Mini 24"
m (→Tutorials: refrasing link titles) |
m (adding bullet points) |
||
| Line 36: | Line 36: | ||
The Rotary Attachment allows you to engrave wine bottles, mugs, glasses, flashlights and more. | The Rotary Attachment allows you to engrave wine bottles, mugs, glasses, flashlights and more. | ||
| + | *Icelandic tutorial about how to work with the rotary: [[Epilog_Laser/is#Rotary_attachment]] | ||
| − | |||
== Laserable materials == | == Laserable materials == | ||
| Line 110: | Line 110: | ||
=== How to prepare a vector file PDF === | === How to prepare a vector file PDF === | ||
| − | + | *for cutting shapes: set all vector lines to line width 0.01 mm<br> | |
| − | + | *document needs to be on RGB color setting (no CMYK)<br> | |
| − | + | *when using text, outline the font<br> | |
=== Tutorials === | === Tutorials === | ||
| − | *[[Epilog Laser|How to use the Epilog Laser Mini | + | *[[Epilog Laser|How to use the Epilog Laser Mini]] |
| − | + | ||
*Inkscape Basics overview: [[Inkscape_tutorial]] | *Inkscape Basics overview: [[Inkscape_tutorial]] | ||
| + | *Inkscape Basics: [[Inkscape_tutorial#Changing_image_to_vector_using_trace_bitmap_option|How to change image to vector in inkscape]] | ||
| − | *Icelandic tutorial: [[Epilog_Laser/is|Leiðbeiningar fyrir Epilog laser]] | + | *Icelandic tutorial: [[Epilog_Laser/is|Leiðbeiningar fyrir Epilog laser]] |
*Icelandic tutorial: [[Epilog_Laser/is#Rotary_attachment|Leiðbeiningar fyrir rotary attachment]] | *Icelandic tutorial: [[Epilog_Laser/is#Rotary_attachment|Leiðbeiningar fyrir rotary attachment]] | ||
| + | |||
=== Tips === | === Tips === | ||
| − | + | *cutting: put the design in outlines (no fill's).<br> | |
| − | + | *rastering: put the design in fill's (no outlines).<br> | |
| − | + | *For better control of where to cut on your material: crop document size to drawing size<br> | |
Revision as of 11:20, 14 August 2014
English • Deutsch • français • español • íslenska • 日本語 • Nederlands • norsk bokmål • galego • føroyskt • Türkçe •
Contents
Overview
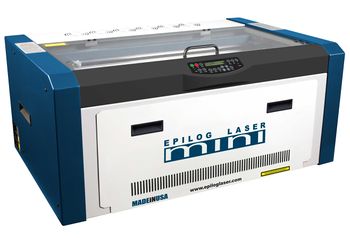
The Epilog laser is a cutting and engraving machine. You can work with various materials such as wood, acrylic glass or cardboard. You will need to prepare a vector graphics file in the shape you want to cut and/or engrave. The machine can take material sized up to 60 by 30 centimeters. Any vector design file needs exported to PDF file format. The machine does not cut metal, though it can engrave certain coated metals.
Technical specifications
| Epilog Mini 24 | |
|---|---|
| Engraving Area | 24" x 12" (610 x 305 mm) |
| Maximum Material Thickness | 5.5" (140 mm) |
| Maximum Material Thickness with Table Removed | 8" (203 mm) 23.5" x 11.75" (597 x 298 mm) engraving area. |
| Laser Wattage* | 30, 40, 50, or 60 watts |
| * 40 Watts is the default in Fablabs | |
Available Accessories
Rotary attachment
The Rotary Attachment allows you to engrave wine bottles, mugs, glasses, flashlights and more.
- Icelandic tutorial about how to work with the rotary: Epilog_Laser/is#Rotary_attachment
Laserable materials
| Engrave | Cut | |
|---|---|---|
| Wood | x | x |
| Acrylic | x | x |
| Fabric | x | x |
| Glass | x | |
| Coated Metals | x | |
| Ceramic | x | |
| Delrin | x | x |
| Cloth | x | x |
| Leather | x | x |
| Marble | x | |
| Matte Board | x | x |
| Melamine | x | x |
| Paper | x | x |
| Mylar | x | x |
| Pressboard | x | x |
| Rubber | x | x |
| Wood Veneer | x | x |
| Fiberglass | x | x |
| Painted Metals | x | |
| Tile | x | |
| Plastic | x | x |
| Cork | x | x |
| Corian | x | x |
| Anodized Aluminum | x | |
| Stainless Steel | * | |
| Brass | * | |
| Titanium | * | |
| Bare Metals | * | |
| * CO2 lasers will mark bare metals when coated with a metal marking solution. | ||
Usage machine
Portal:Safety: NEVER let the laser machine operate unattended. Many materials have the potential to suddenly burst into flames.
How to prepare a vector file PDF
- for cutting shapes: set all vector lines to line width 0.01 mm
- document needs to be on RGB color setting (no CMYK)
- when using text, outline the font
Tutorials
- How to use the Epilog Laser Mini
- Inkscape Basics overview: Inkscape_tutorial
- Inkscape Basics: How to change image to vector in inkscape
- Icelandic tutorial: Leiðbeiningar fyrir Epilog laser
- Icelandic tutorial: Leiðbeiningar fyrir rotary attachment
Tips
- cutting: put the design in outlines (no fill's).
- rastering: put the design in fill's (no outlines).
- For better control of where to cut on your material: crop document size to drawing size
