Difference between revisions of "Roland GX-24 CAMM-1"
m (→Tips: fixing typo) |
m (→Tutorials: adding link) |
||
| (7 intermediate revisions by the same user not shown) | |||
| Line 2: | Line 2: | ||
[[File:Roland GX-24 CAMM-1.jpg|thumb|350px|Roland_GX-24_CAMM-1]] | [[File:Roland GX-24 CAMM-1.jpg|thumb|350px|Roland_GX-24_CAMM-1]] | ||
| + | |||
== Overview == | == Overview == | ||
The Roland GX-24 CAMM-1 is a drag knife cutter. You can feed the machine vinyl sticker material for creating custom sized stickers. You can also feed it copper sticker material, useful for flexible circuits or antenna design. The machine can take a material on roll or a piece with the maximum width of 58 centimeters. You will need to prepare a vector graphics file in the shape you want to cut. The vector design file needs exported to PDF file format. | The Roland GX-24 CAMM-1 is a drag knife cutter. You can feed the machine vinyl sticker material for creating custom sized stickers. You can also feed it copper sticker material, useful for flexible circuits or antenna design. The machine can take a material on roll or a piece with the maximum width of 58 centimeters. You will need to prepare a vector graphics file in the shape you want to cut. The vector design file needs exported to PDF file format. | ||
| + | |||
| Line 16: | Line 18: | ||
|58 cm | |58 cm | ||
|} | |} | ||
| + | |||
| Line 23: | Line 26: | ||
| − | |||
| − | + | === How to prepare a PDF === | |
| − | + | A vector PDF can be made with either inkscape or Adobe illustrator. | |
| − | + | ||
| + | *Inkscape is open source program, thus free to downloadː [http://www.inkscape.org/ http://www.inkscape.org] | ||
| + | *Illustrator is a commercial design software, which can be obtained via a licence ː [http://www.adobe.com/products/illustrator.html http://www.adobe.com/products/illustrator] | ||
| − | |||
| − | |||
| − | |||
| − | |||
| − | |||
| − | |||
| + | ==== How to prep in inkscapə==== | ||
| + | When your design is ready, set the page size. (menu > file > document properties) | ||
| − | + | [[File:1_how-to-prep_inkscape_document-size.jpg|200px]] | |
| + | [[File:2_how-to-prep_inkscape_document-size.jpg|200px]] | ||
| − | + | ||
| − | *For | + | Then select you design and open the fill & stroke menu (menu > object > fill&stroke) to define the lines. |
| − | + | ||
| + | *'''for cutting shapes''': turn off fill, turn on stroke, set it to 255 red, and set the stroke style to 0.02 mm<br> | ||
| + | *'''For engraving''' keep the fill on and set it to black, and turn the stroke off. | ||
| + | |||
| + | [[File:inkscape-fill-and-stroke-menu.jpg|600px]] | ||
| + | |||
| + | |||
| + | |||
| + | |||
| + | if objects need to be joined, first make sure it is not a group (menu > object > ungroup) | ||
| + | |||
| + | [[File:inkscape-using-union.jpg|800px]] | ||
| + | |||
| + | |||
| + | |||
| + | === Tutorials === | ||
| + | |||
| + | *[[How_to_use_the_Roland_GX-24|How to use the Roland vinylcutter]] | ||
| + | |||
| + | |||
| + | *[https://www.youtube.com/watch?v=XK8aqqs5F1U YouTube project example from start to finish] | ||
| + | |||
| + | |||
| + | *Inkscape: [[Inkscape_quick_start_guide|Quick start guide]] | ||
| + | *Inkscape: [https://www.youtube.com/watch?v=i-xxhphybnE| How to convert a image to a vector (video)] | ||
| + | *Inkscape: [https://www.youtube.com/watch?v=bwqMusJwu3Y how to get started (video)] | ||
| + | |||
| + | |||
| + | *tutorial beginners project: [[Inkscape_how_to_make_name_sticker|How to make name sticker in Inkscape]] | ||
== Examples == | == Examples == | ||
| + | Photo stream project examples ː [https://www.flickr.com/photos/fablab-reykjavik/albums/72157648478591897 heat press], | ||
| + | [https://www.flickr.com/photos/fablab-reykjavik/albums/72157643999927025 vinyl cutting], | ||
| + | [https://www.flickr.com/photos/fablab-reykjavik/albums/72157644658037935 screen printing]. | ||
| + | |||
| + | |||
<gallery> | <gallery> | ||
File:4_example sticker.JPG | File:4_example sticker.JPG | ||
Latest revision as of 21:25, 12 July 2016
English • Deutsch • français • español • íslenska • 日本語 • Nederlands • norsk bokmål • galego • føroyskt • Türkçe •
Contents
Overview
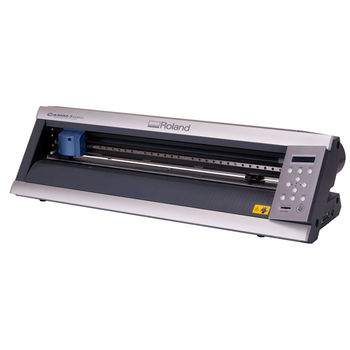
The Roland GX-24 CAMM-1 is a drag knife cutter. You can feed the machine vinyl sticker material for creating custom sized stickers. You can also feed it copper sticker material, useful for flexible circuits or antenna design. The machine can take a material on roll or a piece with the maximum width of 58 centimeters. You will need to prepare a vector graphics file in the shape you want to cut. The vector design file needs exported to PDF file format.
Technical specifications
| Roland GX-24 CAMM-1 | |
|---|---|
| Maximum cutting width: | 58 cm |
Usage machine
Portal:Safety: Do not put your hands near the tool path unless you are sure that the machine is not going to move!
How to prepare a PDF
A vector PDF can be made with either inkscape or Adobe illustrator.
- Inkscape is open source program, thus free to downloadː http://www.inkscape.org
- Illustrator is a commercial design software, which can be obtained via a licence ː http://www.adobe.com/products/illustrator
How to prep in inkscapə
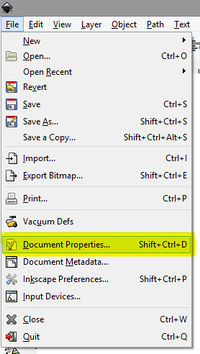
When your design is ready, set the page size. (menu > file > document properties)
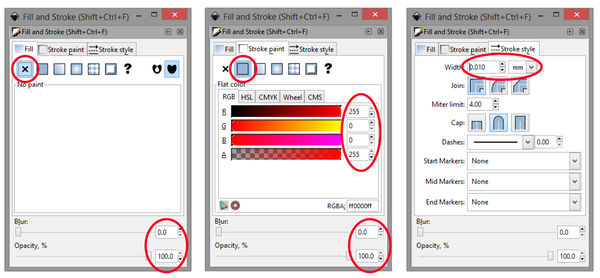
Then select you design and open the fill & stroke menu (menu > object > fill&stroke) to define the lines.
- for cutting shapes: turn off fill, turn on stroke, set it to 255 red, and set the stroke style to 0.02 mm
- For engraving keep the fill on and set it to black, and turn the stroke off.
if objects need to be joined, first make sure it is not a group (menu > object > ungroup)
Tutorials
- Inkscape: Quick start guide
- Inkscape: How to convert a image to a vector (video)
- Inkscape: how to get started (video)
- tutorial beginners project: How to make name sticker in Inkscape
Examples
Photo stream project examples ː heat press, vinyl cutting, screen printing.


