Backstrap loom
Contents
History
Backstrap loom is a simple loom which has its roots in ancient civilizations. Modern day looms include a rigid heddle. And many include a frame to which the warp yarns and sometimes even the heddle is fixed. I'm going to make a more traditional piece with only very few parts and using weavers body as a way to tension the warp yarns.
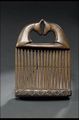
Antique heddle

Round heddles. This shape intrigues me.

Then there is the "fishtail" loom that is used to make more complex designs more easily than with normal loom.
 This one has some shorter slots for pattern picking.
 Pattern picking tape I made at home.
My experiences
I´m only starting to experiment with using belt loom and so far I've noticed that a wider belt is needed. Because thin belt digs too deep and is painful. Also the shuttle design is critical for easy making of the woollen ribbon. There are several kinds of shuttle designs and it would be wise to experiment with three or four types before settle for a design. It deeds to have a tapered edge for "beating" the weft yarns tight enough.
The old wooden loom that I have back home is just too heavy. It requires high amount of tension just to operate. And it's too top heavy, it tends to topple over the warp yarns a lot. I want to achieve light enough loom that is still strong enough to work for a long time.
Parts
-Rigid heddle
-Shuttle
-Belt
-Some sort of holder between warp yarns and belt
(-Threading station)
The way loom is traditionally used in Finland.

Holder I´d like to make. I like the idea that everything would be hold in place by leaning back, not with extra fastening.

Optional threading station. This would be really helpful thing to have.


First two tests

3D-printing a shuttle

I had some real difficulties designing the shuttle with Tinkercad. I could not make the tapered edge no matter how I tried. After watching some tutorial videos about Tinkercad I found a solution, in "shape generators" index there is the "community" section and there I found a shape that already had tapered edges. After tweaking my design around I was finally able to put the design in MakerBot.

First try

Second try


The shuttle turned out nice. It works just like I hoped it would work. I printed it twice to see how the orientation affects the end product. The upward position was supposed to be at a 90 degree Z angle from the bed but... yeah, if the piece is moved even a tiny bit before making the 90 degree Z angle command it may not be totally upright. I forgot to lay the piece flat in the bed before angle change. So it ended up not so upright. But still it was enough to see the differences between it and the one printed while flat in the bed. I liked the flat one better and left the supports to the not-so-upright one to be able to show others how a print can almost go wrong. Luckily in this case the wrong angle does not matter.
Testing the final slot and hole sizes
I made two small size tests. One with 5.8mm plexi and second with two pieces of 3.8mm plexi that I was told could be glued together. The problem with thick plexi was that it needed two times until it cut through. And the edges underneath are still pretty rough considering the loom would be used with hairy wool yarn. So the edges should be either carefully sanded or warmed up to make them smoother.
The problem with gluing is that if I use normal super glue it will show through the clear plexi that I'm using. The other method would be using methylene chloride a type of solvent cement. It is a possibility yes, and I will try it if I have time. But I don´t like the idea having to cut two identical pieces and then trying to line them up exactly and gluing them to eachother.
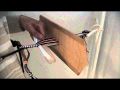
Belt
I bought a piece of black cotton, made a paper pattern from a newspaper page and cut the fabric. I sewed two pieces of the same pattern together with some padding fabric in between. I made the belt quite wide so that it would be comfortable to use.
I 3D printed some hooks I designed myself and the belt pieces. I tried to assemble them together with a piece of string but that did not work. I realized why thick piece of metal wire is used. The pieces need that support to stay in the orientation they need to be. So still have to find that piece of wire.
Final loom
I think considering the fact that the thicker plexi is so heavy and my main goal was to have a lighter loom I'll stick to the thinner plexi for now. I know I can get the kind of plastic I really want back home from Finland. I'll make the final design on a thinner plexi and use it until I'm able to make the loom I want in Finland.